Showing posts with label lace. Show all posts

Wednesday, 10 July 2013

Men's Toupee Hair System - making, cutting & styling

Recently I had to make a hair system (toupee) that was to be in a 1960s pompadour style. Effectively it should look like the top of this but without the gel:

From: http://www.elvis.com/news/detail.aspx?id=6399

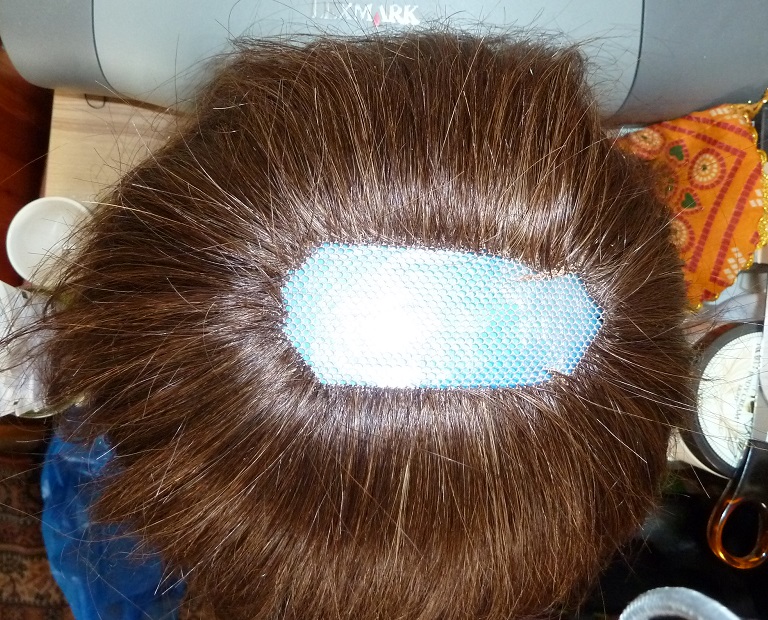
The Base - I used durable wig net and a lace perimeter that enables bonding and a natural hairline. This is the first time I have used wig net is for this type of work. The pros are that it is cheap, it is a reasonable colour if working with brown hair and it is very durable. The cons are that the holes are very large and because the hair on the top of the head is more likely to separate than hair hanging down, you can rely less on heavily dense large knots to hide the holes than if this material was being used at the back or sides of a wig. As a result I had to do so many more knots, which was time consuming.


The Hair - I used Indian hair in a number 4 with some blonde to to create a variation of colour/highlight. This type of hair is softer and more malleable than say Chinese, and the natural movement/kink/wave of the hair helps when creating the hairstyle. The hair was a lot longer than I needed for this style, but it didn't matter as I was going to cut it anyway. It is worth thinking about the style you wish to achieve when selecting hair, as your end result can be heavily influenced by this aspect. Some hair types do not lend themselves well to certain styles.


Cutting & Styling - I cut the hair into a pompadour style, then combed it back and ran some wax through the dry hair. I then styled it by combing the under layers back towards the crown, and then combing the front upper layers in a diagonal fashion towards one side, and using my hand to 'bump' the front to give it that pompadour look. I fixed the style with hairspray.


Overall I am pleased with how this turned out.

Monday, 18 March 2013

Choosing Wig Lace and an Update

I have been away for a while battling flu and sinusitis. I am still struggling with the latter, but hope to be back to blogging more regularly now.

I had a comment to my post about laying your lace down on the block, and I thought I would quickly address the reply/response here as the information may be useful to other blog readers.

The question was this:

Hello, thank you for all the info!
I just have a question though..
What type of lace do you recommend?
I'm from Greece so I have a hard time using english terms for the lace I need. (Simply saying swiss or french lace won't do it)
Maybe you could tell me how this lace should look like? (how soft, how large are the wholes, is it strechy etc) so i would know what I'm looking for...
Also, one last thing, I search my lace at fabric stores, do you think there's another place more qualified for me to search?


The lace - whether termed Swiss, French, German - is a specific type of 'lace' (which is actually a net fabric) that is designed for wig making. Although certain types of it are often considered fragile, it is quite strong and usually made from a monofilament type fibre (similar to the thread used in fishing lines). You will find net or tulle at the fabric store, but that fabric is designed for dress making or for making underskirts to go under dresses and skirts. What you need is wig making lace. You can buy it from wig making suppliers. 

You can find two suppliers I recommend here: http://makingwigs.blogspot.com/2013/01/where-to-buy-supplies.html

An example of the type of lace you might wish to buy is this:  http://www.royer.co.uk/products.php?show=74 
Which is  - 2906Nylon mononet40 denier 60 cm wide skin shade STANDARD STAGE LACE
These would also work:
2905Nylon mononet20/30 den 60 cm wide skin shade FINE STAGE LACE (this will be more fragile and less durable)
3104Ultra fine H/T front lace60 cm wide 20 denier lace skin tone for fine fronts STAGE & FILM (again this will be more fragile and less durable, although it would make a good lace front as it should blend well - it will be unlikely to withstand long-term vigorous bonding over many months)


Terms you see used are: superfine Swiss, Swiss, French, German, monofilament, mononet and tulle. I will be making a blog post shortly with more detailed explanations about these different types of materials. The main thing to do when trying to pick a lace for making a wig is if you are unsure buy from a wig making suppliers. At least this way, you will be using something designed for making a wig. You can also always ask the supplier for their advice.

 In the case of Hugo Royer, the lower the 'den' (or denier) number, the finer the lace or net (meaning it is more fragile and less durable, but also less visible and blends very well if bonded). Sometimes you can ask for a small sample of the lace or net, and the company will send it for the price of shipping. It is always worth asking, as this gives you a chance to see the colour as well as the texture and how fine it is. When starting out, I suggest buying no more than a metre at most . If the lace turns out to be wrong, you have not wasted too much money and you may later find a use for it, or can sell it to someone else who might use it. If the lace is correct, you can always buy more.

One a side note - I have had a discussion recently with someone else who follows this blog and who I am friends with. They wish to use the type of net and tulle found at the regular sewing fabric store. I am not saying it is unusable, as you can definitely use it for certain purposes. I have used it in the past to practice ventilation on and to make prototypes of wig caps - where I did not want to waste the proper wig making lace, which is very expensive. It is good for experimenting with or when you are learning how to make a wig cap so that you can learn to get the right fit for the measurements you have taken. It can also be good for a wig that will be worn as part of a costume or infrequently. The type of net/tulle found at the sewing stores has a tendency to rip or catch more than the wig making lace, and this is especially true if using a wig ventilation needle. Some people are choosing to make wig caps from this type of material and using a latch hook to do their knots - this is better as it is less likely to catch or rip the material because it is not such a sharp tool as a ventilating needle. The downside of this material is that it tends to come colours that are less blendable with people's skin tones, and compared to the type of wig making lace I use, the holes are much more visible as they are far bigger.

I hope this helps.

Monday, 28 January 2013

Making a Wig Foundation with Lace - Important Considerations ~ Laying Your Lace

I had a query today about how I made the parting on the wig I am making, as it appears so clearly defined and straight. It got me thinking about some of the things I have learnt since starting to experiment with making wigs. One thing I remember researching a lot is: wig foundations (bases/caps). Reason being: a. this was something I am quite obsessive about (due to my hair loss and needing comfort and realism) and b. because if this aspect is not quite right, then the whole thing is pretty much wrong!

When you make a foundation (wig base/cap) with lace, you really need to take your time. There are a few things that it is important to get right at this stage, as they will otherwise affect the wig at a later stage when it is impossible to rectify them.

One of the aspects of making a foundation that needs to be taken into account is how you place your lace. Let's rewind a bit...

When you want to make a foundation, you need to take either a head mould or some measurements of the head that you will be fitting the wig foundation to, and then transfer these onto your canvas or wooden block. Of course, you can take both a head mould and measurements and use them together if you so desire. In my case I am currently using a canvas block, so I put blue tape over it, which allows me not only to have better vision as it makes the lace and hair more contrasting against the block, but also gives me the ability to mark out patterns, measurements and shapes on the block to help me with making the foundation and later ventilating the hair. Once I have marked the block with the head pattern I need to follow, I then take the lace and start to pin it to the block to make the 'form' of the foundation, which can then be sewn where necessary.

At this stage it is vital that one takes into consideration the direction of the lace holes on the different parts of the head/wig. For example, like fabric, regular lace (not the stretch kind) has a bias which means that if you pull it when it is oriented in this position, it will stretch or give somewhat. You do not want to pin the lace when it is on the bias, as it will have stretch to it. If you don't know about the bias of material, then take a fresh piece of square or oblong lace, and hold it on the diagonal (like a diamond shape). Gently tug the corners. You will see it stretches or gives slightly. This is the bias. You would not want to pin the fabric with this being on your vertical or horizontal part of the wig (so not on the front to nape or ear to ear over the top) as otherwise the wig will stretch and move in a most undesirable way.

One of the main areas you want to carefully lay lace is the front hairline to crown. This is the part which everyone looks at the most when they are talking to or interacting with someone wearing a wig. Ideally on the front hairline to the crown AKA the vertex, the lace holes should be marching straight backwards in a nice line and straight across the head in another straight line - you would see the holes lining up in rows going across the head, and rows going backwards towards the crown - not on the diagonal. If you pin your lace on the bias in this area, the holes will be on the diagonal and not straight down and across. This would cause a problem when you came to ventilate the hair onto the foundation as the hair would not fall into part-able rows. It would be criss-crossed.

Here is an example of pinning the lace and the lace direction.This image should be clickable to enlarge. See the picture below for a close up of the lace holes. The arrows and lines represent the two directions of the hole: straight from the crown to the front, and across from left to right.
Note how I am smoothing the lace in the vertex section to get it nice and taut.

By following this structure when pinning your lace to the block, you should end up with rows of hair that can then be parted from front hairline to the crown as a normal part line would be. For some people this is too linear and perfect, in which case you can just part a messier parting by carefully using your comb in a more random zig-zag manner when making the part line. My own bio hair always had a very linear part line for some reason, which is why I tend to favour that a little.

 You can see the orientation of the lace holes on this picture more clearly, and how it produces a very crisp part line. In fact, if you ventilate more heavily than I do, the part line will look even more delineated because it will be denser hair around the parting.

There is second consideration when laying the lace onto the block. It is important to lay the lace for the front hairline to the crown as flat and taut as possible. You do not want this material to be rucked up, as if it is the wig will not lay flat or moulded well to the head/scalp shape. This is the case for all wigs, but is especially noticeable in lace front and full lace wigs, because you need the lace to adhere flat to the skin where you are bonding in order for it to look flawless and undetectable. If you have too much material or it was not pulled taut and smooth when making the foundation, you will end up with small gathers in the lace when you bond, which causes a rippling effect against the skin. This can also happen if the wig is too small and is pulling at the skin. For this reason, keep smoothing the lace fabric down gently with the palm of your hand as you pin; you may find you need to unpin, smooth and re-pin as you go. One of the reasons for this is because as you pin in another place on the block, you may find the way you have already pinned it elsewhere is not optimal and needs to be adjusted. A little bit fiddly, but worth the effort in the long-run.

I shall continue this mini series with a further couple of posts about other things that are wise to take into account when making your foundation and laying your lace down.

Friday, 7 October 2011

A Stressful Week - Decisions

This week has been a bit stressful for me in terms of wig making.

The good news is that I have made progress with sewing the galloon and that is all done now. I am really pleased that I did finish that within the time frame I had given myself. I am making a real effort now to set myself mini targets and to stick to them as I know if I don't do this, I will never get anywhere with the wig making. For anyone else who is reading this and is thinking about having a go or who is already trying to teach themselves wig making, I would suggest that you do the same. Long term and short term targets are really valuable tools in motivating yourself. My short term target right now is to get this foundation (wig cap/base) finished. My mini goal is to finish sewing my first piece of lace down.

After I finished with the galloon, I started laying down my first piece of lace, which covers the: ear to ear, vertex and front hair line area. It took me a long while to do that; much longer than I anticipated. I think this was partly because I have the kind of head shape that requires some darts. I found it more challenging to lay down this lace than the tulle when I made the prototype. The area is slightly different because when I made the prototype I was constructing a circumference band type wig cap, whereas because I wanted to lessen the amount and appearance of galloon going over my vertex area, I decided to make the real wig cap with only one piece of galloon on the vertex, in addition to the perimeter galloon, and this piece goes over the crown area.

The key to laying lace is to get the front hairline as smooth and flat as possible. You don't want any bumps, lumps, ridges or wrinkles. Instead of stretching the lace to make it taut, you need to smooth it with your fingers and then pin in place. I found myself smooth and pinning, then smoothing and re-pinning as pinning in a new area kept creating undesireable wrinkling in other areas. I took the lace off several times and re-started. I think the key at the novice stage is:
  • To have patience
  • To not be afraid to re-start
  • To take frequent breaks
  • To come back again later if you can't do it and try again 
Sometimes it can be really hard to bear those things in mind; especially when you really want to get onto the next stage or just to finish something you had set your mind to doing. However, it is well worth taking the time to ensure that this bit is done correctly as it will make a big difference to the overall look and fit of the wig.

I thought I would have a couple of darts running from the galloon at the crown towards the front, however I ended up with one over each ear. When I made the tulle prototype, I believe I ended up with one over each ear and a couple on the top - so in a way, this may be better. The next step, which I have completed, was to sew the darts down. This helps to keep them smooth and flat.

After sewing the darts, I commenced sewing the lace onto the interior edge of the galloon. I have sewed two thirds of that and am just about to sew the last part (once I have finished writing this). I enjoy the sewing; it is quite therapeutic. I have been timing myself and I noticed I am definitely getting quicker the more I do it. I am hand sewing at the moment, but in the future I hope to try doing most or all of it on the sewing machine.

Once I have completed sewing the lace down, I can cut the excess off and start laying the next part down (the crown to nape).

Now onto the bad news...

I have had to make a decision over how to best ventilate the hair when I get to that stage. Several of my online friends and myself have wondered about the correct and optimum length of the returns (that is the piece of hair that is left and can stick out, sometimes called the mustache, when you make a knot with a hair strand). The wig making books that I have (I have 3), and that other people I know who are interested in wig making have, say one thing. Other people - on You Tube and at a wig making suppliers & a hair suppliers for example - were saying a variety of different things. I found this very confusing and completely overwhelming. Having so many different opinions stating this is how you should do it, makes it very difficult to judge which option or path to choose to go down. I started to feel like a cook who was in the middle of following a recipe and then had people saying: don't do that, it won't work out right, do this... The reality is that the length of the returns is important and a crucial part to get right of the whole wig or hair piece making process. Knowing that caused me to feel an intense amount of stress and pressure. No one wants to think they are going to expend all this effort and energy to get it wrong.

I have come to the conclusion that when you choose to attempt to make wigs, that canvas wig block, foundation and hair become your baby. To complete the task, a certain amount of dedication and enthusiasm is required and because most people who attempt to do it have great passion about what they are doing and want to achieve, it is hard not get really emotional about the whole process. For me, the learning curve continues. My lesson of the week has been to realise that will make mistakes and to be prepared to pick myself up, dust myself down and try again.

Wednesday, 28 September 2011

Back After The Summer Break

Hi everyone!

I wasn't anticipating taking a summer break, but such is life - things got very busy for me and I just didn't have the time to devote to updating my You Tube channel or this blog. The good news is that I am now back and raring to go. I have already made a start by uploading a You Tube video and I am in the process of uploading another. I have been having a few problems with You Tube and Windows Live Movie Maker, so we shall see if it works or not. *Fingers crossed*

Over the summer I finished off a couple of wig making projects:

  • Converting a full lace wig into a regular style wig
  • My first wig repair

Converting the full lace wig into a "regular-style" wig - this was a project I started back in the early summer, in a bid to make some use of a wig that I actually never wear. The wig was wrongly sized for me and just would not work when I tried to bond it. When you add to this the fact I am not crazy on bonding anymore, you end up with a wig that sits in the closet. The sad fact of the matter was that: a. I had spent a lot of money on that wig and b. the hair quality was lovely. So I thought that it was about time I tried to make it functional for me.

To cut a long story short, the way I chose to embrace this task was to edge the entire wig with monofilament galloon. This gave the wig a little more rigidity and structure. As the wig was on the large side in some areas and flapping, I decided to add a piece of elastic to the nape, along with a couple of long wig springs. This means that the nape holds down really well. I also added a zig-zag wire wig comb to the nape (but I need to remove this or alter its position as it rubs my occipital bone). I also added a few snap combs which I experimented with using by clipping them to my stocking wig cap - I am not convinced about this! It does work, but getting them and the stocking wig cap in exactly the right place is tough...

So when I went to get this baby cut, it ended up being stuck down at the front... ugh, yes I know, I know... I said no bonding! But needs must - I had an appointment! I didn't actually bond the entire front, I instead bonded the very top front from not even temple to temple, but corner to corner of my horizontal hairline (going across the top of my face) with one large piece of Supertape on the roll. Then I used some bobby pins and wedged those into the sides and a couple over my ears - instead of gripping my hair (which doesn't work) they gripped my stocking wig cap. The back needed no bonding or bobby pins - now that was a result! I basically have something that is just beyond a lace front!

If I get myself into gear, I shall show some pictures of the inside of the cap. I have pictures of the wig before and some of it after it was cut into a new style.

My first wig repair - A friend of mine, who has alopecia and has to wear wigs full time, asked me to repair a wig for her. It's a really nice wig, has a bit of wear and tear to the cap, but totally serviceable, except for the fact that it was: balding. Now I always think that a wig that is balding is a big insult! As if it's not bad enough to be bald or balding, your wig is balding too!

I should establish a couple of facts here: 1. my friend was aware of my novice wig repairing/making status and 2. I made no promises that I would do a good job.

I set about turning this balding situation around.


There were a few things I found out about repairing - 
  • The wig cap - mesh, lace, net, mono (whatever it is) should be examined prior to mending. I started mending, only to discover there were very tiny (I mean tiny) little disruptions - you can read: holes - to the lace/mononet. This meant that if one tried to ventilate there, they risked making the situation worse. I kept away from those areas and tried to ventilate so the hair would fall over them and thus, conceal them. They were literally 1 edge of a lace/net hole, but often there seemed to be several of them in the same area - as if the lace were failing slightly.
  • Knots - always, always check the knots of the hair already ventilated onto the wig or hair piece before agreeing to repair it. I agreed to do it and started work before I realised that the hair on the rest of the wig was basically going to fall out pretty pronto, due to a total failure of most of the knots! I did speak to my friend about this - turns out there has been virtually no knot sealing and the use of ball-tipped pin-head brushes on the wig. I agreed to continue with the task, but in the future I would not attempt to repair anything with knots like that. It is a case of not being worthwhile for the client/friend or for the ventilator. 
  • It takes a long time - if you are ventilating into completely bald or almost completely bald areas, no problem, as the area is essentially clear and free of hair just like a fresh piece of lace would be. If the person whose wig you are repairing wants you to add hair throughout areas where there is already hair, but it is a bit sparse, then be prepared to spend some time doing it. This is because working in that type of area is hard. You have to continually pin the hair back so that you can see the holes and not get your needle/hook tangled up in the hair that is already there. I did use a water spray as well. 
The outcome of repairing = the wig looks great, but would I do it again? Probably not! It took me far longer than expected. I was pleased with the result, but I also felt that it was one of those cases where sometimes it is perhaps better to start from scratch and make something new. 

Update: my own wig making - So my own wig making has taken a back seat whilst I got on with the repair and family life. I am getting back into it this week and shall be updating again with my progress and hopefully some pictures. The second video has finally uploaded, so here's where I am at now:


Tuesday, 5 July 2011

Got My Materials... and Converting Full Lace Wigs

Hi everyone!

Sorry for the delay in writing this. I have been so busy with life and wig making. First off, I have just uploaded a short video to You Tube, in which I show you the materials I received from the wig making company. To summarise:
  • Monofilament Galloon in 1 cm and 0.7 cm widths
  • Light Blonde Galloon in 1 cm and 0.5 cm widths
  • Honeycomb Lace in Light Blonde
  • Fine Lace (like very fine Swiss lace) - comes in flesh tone
  • Stretch Lace (has honeycomb type holes - slightly different to some stretch I have seen) - also comes in flesh tone
  • Transparent Thread
I also ended up separately buying a really large reel of blonde colour polyester thread as the one I have is just a regular cotton reel and I know I will probably run out of it at some inopportune moment. I also picked up a big pack of pins too as I find I am using a lot of these and sometimes they break or bend etc.

Here's the video:

I mention in the video that I have been converting a full lace wig into a non-bonded one. The reason for this is two-fold. Firstly, due to medical problems, the wig no longer fits me correctly for bonding. It means that bonding it is very difficult (more-so than normal) as the wig does not want to lay correctly to be adhered down and secondly, because of those medical problems I find bonding to be difficult because I do not really have the energy to keep my arms in the air for long periods of time on a regular basis. So, there I was with a 16 inch remy wig just lying in my closet waiting for something to happen. I actually really need a wig right now that works for me, as the hair I do have is very short and while I don't mind that, there are times when a girl just wants to have long hair. 


So far I have probably spent about half a day working on the wig. I am half-way though. I would say that the effect with this wig is almost like a glueless lace wig, except that the front is no longer lace straight to skin, instead it is monofilament galloon. I shall be ventilating a little more hair into the top middle, as I am parting the hair in the middle - a rarity for me! Parting the hair in the middle helps to make the density less noticeably "pouffy" on top (something that I am trying to get away from as I find it is unflattering on me). I shall also under-ventilate hair into the inside of the galloon as this will help to cover any edge. Once this is finished, I shall be getting it cut into a style and will put up a pic at some point of the finished product.

Anyway, before I started converting the full lace wig, I had finished the prototype cap and tried it on. It fitted me extremely well except for the nape. I think the nape didn't work so well because on my original head mould, I had not managed to cover the bottom inch or two of the back of my head to my nape, so when I put the pattern on the block, I ended up guessing how far my nape extended and so on. Taking this into account, I made a new mould of my head, put it on my block and stuffed it so that I could start making a proper wig cap to make my first wig with. I was mapping out the galloon structure (by default this step essentially creates a pattern for you to follow) and had started sewing the joins, corner darts and the gathers over the ears. Once I have finished the lace wig - by the end of this week - I shall be going back to doing that. I hope to take some pictures so to illustrate what I am talking about. 


Monday, 13 June 2011

Prototype Time - Experimenting With Making A Regular Wig Cap

As I said in my last blog post, I started trying to make a regular-style wig foundation. I am in the process of attempting this at the moment. I have taken some pictures to share in case anyone wants to understand the process. N.B. This is just for practice and a bit like a prototype. I don't want to waste expensive wig foundation materials at this stage in case it goes wrong.

I have outlined my hairline on the wig block using ribbon and then sectioned off a couple more areas, as I will be making each area out of a piece of tulle (when making a real wig cap this would be foundation material such as lace).


Once I did this, I then started by attaching a piece of tulle (when making a real wig cap this would be foundation material such as lace). To do this, I used pins and I made four darts (tucks) where there was excess material. Depending on the base material used, you will probably end up doing this at some point because the material is flat and the head is curved.


Having pinned the material to the head successfully, I then took invisible thread (something like clear monofilament thread) and sewed each dart down its long edge so that it was flat and neat.


I then took blonde coloured polyester thread and sewed around the inner edge of the ribbon to secure the tulle to the ribbon.


I then repeated the process by attaching a fresh piece of tulle to the vertex, although this time I did not need to put in any darts. I then hand sewed around the inner edge to attach the tulle to the ribbon.

The next step is to cut the excess tulle where the two pieces meet and to create a seam between the two and sew them together onto the ribbon to create a neat join.