Since my last blog post, I have
finally gotten around to taking some photos of the
work in progress. Hopefully they will be helpful in illustrating what I have been, and am still, talking about and doing.
The update on making the wig foundation (wig cap) is as follows:
In the video I uploaded on YouTube, I was still working on getting the perimeter of lace and honeycomb tulle sewn down. I have now sewn the entire inside edge of the perimeter down, except for the extended nape.
This meant that I could, joy of joys(!), take the foundation off the block and...
try it on! It also enabled me to remove the mould I had been using.
Trying it on - this was interesting! I was actually rather nervous about it - all this work so far seemed like a big time and energy investment, not to mention the financial aspect of purchasing all the supplies. Then there is that moment where you think:
okay this could go either really wrong or really well. Funnily enough, my mind had not allowed for the middle option of:
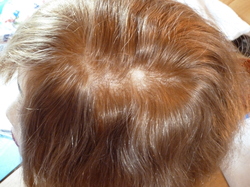
okay-ish. The result thus far (no hair on it, just the lace and tulle) is that it fits me okay.
But - and this is a big 'but' for the perfectionist in me - is not quite as snug as I had hoped for at the front. I think for a first attempt it has been a good learning curve thus far and that it is a good outcome.
One thing I do know, is that undoubtedly I will have to use something at the ear tabs/sideburns area as it is too
flappy. Those of you who have worn or tried on lace front wigs or glue-less lace wigs, will know exactly what I mean by that. This issue is compounded by the fact that the lace I have used is
so fine and
soft that it lacks any inherent structure. I shall have to look at how I can add more support and structure to that area. So far I have been thinking to add some wig springs (of the metal variety), but I am also looking into an alternative form of combs to the ones I have tried. I would not mind using combs
if I could get them to grip my hair there. That is a big 'if', as up till now I have had no luck in that department due to a combination of a loss of density of my bio hair there and my hair being now very fine and slippery in texture. Ultimately, if I have to, then I will tape it down at that point, but of course I would rather not do this.
My next task is to sew the overlapping joins between the tulle and lace - I am already working on this. It means cutting the tulle down so that it fits just underneath the lace at the seam and then when I have done that, pulling the lace over the top and sewing the two down to create as smooth a line as possible on the top vertex.
One thing I have decided and learnt from the whole project - up to this point - is that I also want to try making a wig cap based
PURELY on my
measurements. That is to say, I will take a pattern of my front hairline, but aside from that I shall use the measurements to chart/mark out the pattern for the foundation on the wig block instead of using a mould. This is something that is instructed in all my wig making books, so at least I will have some plan to follow.
Another thing is that I may just go with the whole U-shaped vertex construction that you see on regular wigs - that is: a very fine (often a drawn through silk/French top) and then the sides and back (from crown to nape) being made with a more robust material (like the honeycomb tulle or stretch lace with wefts). I don't think I will do the drawn through option, but I might try doing honeycomb tulle everywhere except for the U-shaped vertex, which could be made from the fine lace. This might give the wig better stiffness at the sides, especially if combined with a metal spring.
I also - I know I am getting ahead of myself now, have it in my mind to try making a cap that does have a wefted back and sides, but sewn onto stretch lace in the manner of a
sheitel (Jewish regular wig). Just to see how that works and turns out.
So many ideas and options... so little time and energy!