Showing posts with label hair. Show all posts

Monday, 18 November 2013

Where to Buy Virgin European Human Hair for Wig and Hairpiece Making

A wig making friend of mine just found my blog and that got me thinking: I am conscious I haven't written here for a while. Apologies! I have been really busy doing a lot of background work, and also struggling with my chronic health problems. Unfortunately this means that I don't have time for the extras like blogging.

I meant to post pictures of a couple of things I have made so I will try and get round to that ASAP.

In the meantime, I have had some questions sent to me recently. I have replied to everyone, but the answer to one of them I thought might be useful to post on here and I will elaborate a little.

One of my blog readers asked where she could source cuticle correct hair that is suitable for a caucasian.

Raw European Hair for Wigs and Hairpieces

Procuring true cuticle hair is complicated unless you know where to go to. There are SO many sources on the Internet claiming to sell virgin this and remi that... a lot of it is absolute falsehoods, and it's very easy to end up buying really poor quality hair for a high price.

If one wants to buy cuticle hair, then the best type of hair for someone who is caucasian would be virgin European human hair. This type of hair is really expensive, so it is best to use it when you know what you are doing (rather than for learning and practising) and to use it on hairpieces and wigs that you envisage having a long life. In order to get the most value from this hair type, as it lasts a long time, you would not really want the base/foundation to expire before it does.

It's really important when buying hair to ensure not only is the cuticle intact, but also aligned (meaning that it has been kept root to tip - clearly identifiable so that you know which end is which).

There are a few sources where I would buy this from, but to make this simple I will list the 2 main ones. Both sell cuticle correct and aligned, virgin European human hair in a range of colours and amounts (you can buy per small increment).

US - De Meo Brothers in New Jersey. http://demeobrothers.com/

UK and Europe - Hugo Royer. http://www.royer.co.uk/myshop.php?cat=34

Wednesday, 10 July 2013

Men's Toupee Hair System - making, cutting & styling

Recently I had to make a hair system (toupee) that was to be in a 1960s pompadour style. Effectively it should look like the top of this but without the gel:

From: http://www.elvis.com/news/detail.aspx?id=6399

The Base - I used durable wig net and a lace perimeter that enables bonding and a natural hairline. This is the first time I have used wig net is for this type of work. The pros are that it is cheap, it is a reasonable colour if working with brown hair and it is very durable. The cons are that the holes are very large and because the hair on the top of the head is more likely to separate than hair hanging down, you can rely less on heavily dense large knots to hide the holes than if this material was being used at the back or sides of a wig. As a result I had to do so many more knots, which was time consuming.


The Hair - I used Indian hair in a number 4 with some blonde to to create a variation of colour/highlight. This type of hair is softer and more malleable than say Chinese, and the natural movement/kink/wave of the hair helps when creating the hairstyle. The hair was a lot longer than I needed for this style, but it didn't matter as I was going to cut it anyway. It is worth thinking about the style you wish to achieve when selecting hair, as your end result can be heavily influenced by this aspect. Some hair types do not lend themselves well to certain styles.


Cutting & Styling - I cut the hair into a pompadour style, then combed it back and ran some wax through the dry hair. I then styled it by combing the under layers back towards the crown, and then combing the front upper layers in a diagonal fashion towards one side, and using my hand to 'bump' the front to give it that pompadour look. I fixed the style with hairspray.


Overall I am pleased with how this turned out.

Thursday, 17 January 2013

Wig Making Questions: Ventilating Loop, and How Much Hair Needed?

I had a question from a reader asking about ventilating and the amount of hair needed for a wig.

Question:

I know that you're supposed to loop the hair between your thumb and index finger before you begin the ventilation process... I was wondering if the loop is supposed to be even meaning if the hair is 24 inches long originally, will it be 12 inches as you ventilate it or does it not matter?

For total beginners - When you ventilate you need to create a curve (loop) in order to catch the hair in the ventilation needle, which means you can then pull it through the lace hole and do your knot. This is achieved by folding over the top of the length of hair where the root end is - remember the hair you buy and use needs to be cuticle correct or it will tangle and matt up when the wig is worn/washed.

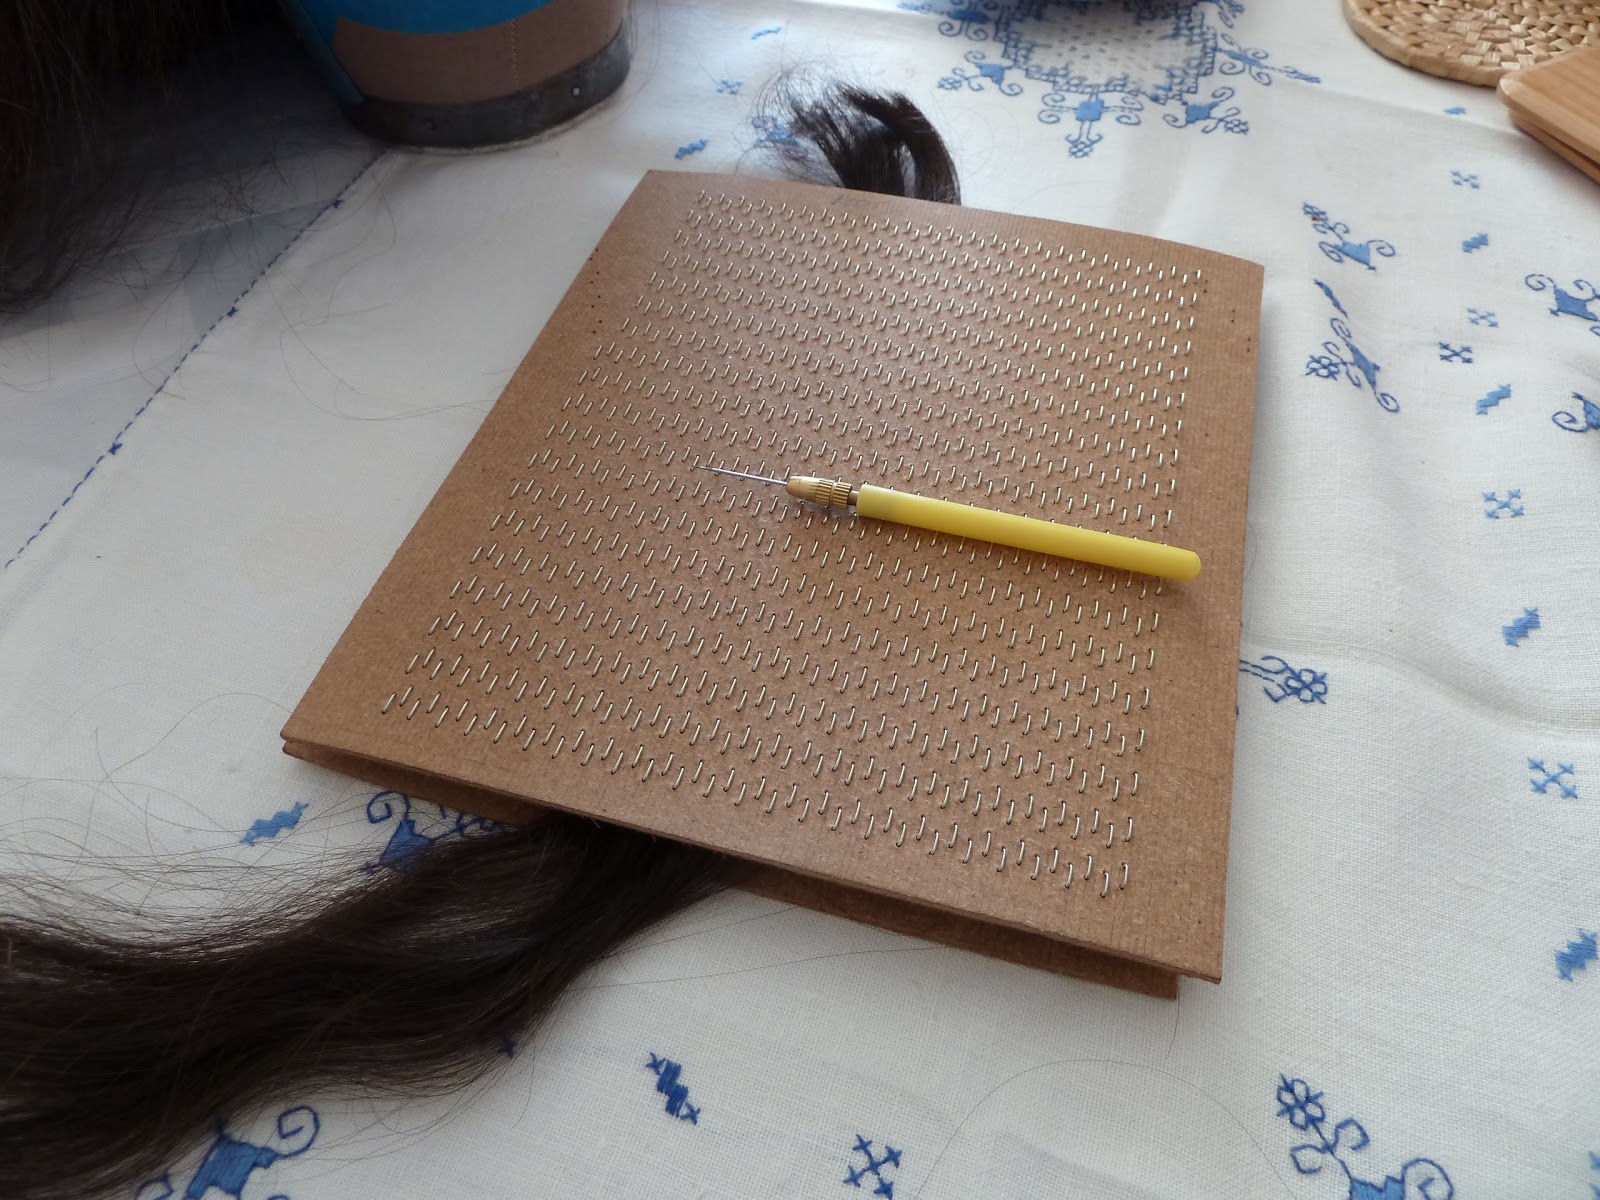
To help keep your bulk, raw hair organised, use a pair of drawing cards. Write 'root' at the top, and always place the hair you are using with the root end lying at the end marked root on your drawing cards. You should be able to tell the root end when you buy the hair, as the hair is usually bound more strongly and obviously at the root end. Depending on how the hair was collected, you can also tell by looking at both ends: one end will normally look 'cut'.

Drawing Cards
Tip: Hold them together with an elastic band or a pair of clamps. If the cards fall on the floor, they may fall apart and all the hair get mixed up in different directions, which would make the hair unusable. 
Root End Marked
 Drawing Cards - The 'Teeth' Hold the Hair in Place and You 'Draw' a Small Amount Out to Ventilate

In answer to the question - Firstly, it should not be even. It depends on the hair used. With processed hair, you can generally get away with longer returns if the cuticle has been completely stripped away (of course it is hard to know whether this has been done or not!). 
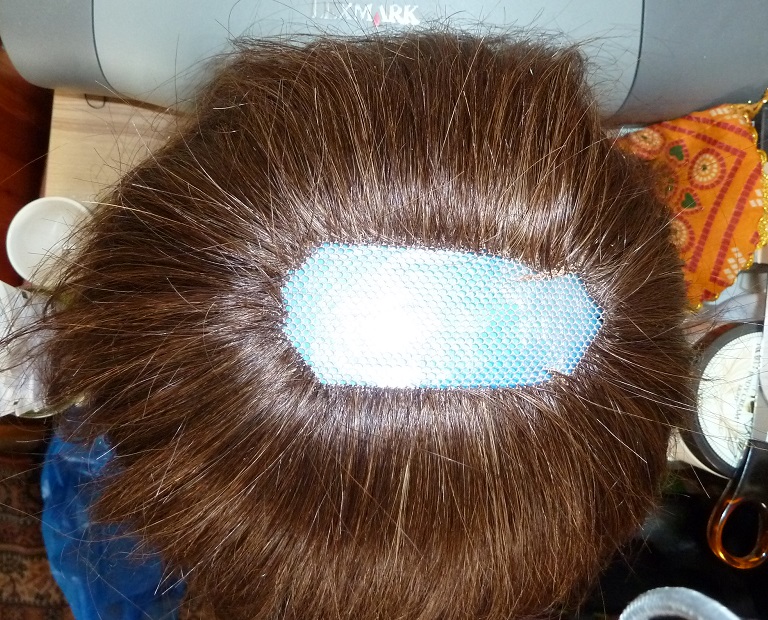
With cuticle intact hair one is aiming for a fold (return) of about 1 inch. Of course this is not a completely exact science, so somewhere around that length should be okay. In my case, I am aiming to do a 1 inch-ish return and this is what I would advise people to do unless the hair is heavily processed and very coarse, thick strands. A good way of judging how it will look is to take a scrap piece of lace, then ventilate about 20 hairs in two 10 strand rows, and just see if the returns are poking up.

 Hair Folded Over to Make a Return

The Loop - this is the holding position for ventilating. Hold the folded loop together between your thumb and index finger. Then draw hairs from the loop through your lace, monofilament or tulle.  
Tip: don't take too much hair at a time from your drawing cards or you might get finger fatigue from trying to grip it all! This also helps to prevent hair wastage when learning, as you may drop some or find it gets caught up and need to chuck it in the bin if the root to tip becomes mixed up.

One problem with returns is the 'salute' you issue - where the returns stand up and poke out of the ventilated hair like a load of regrowth or broken hairs. I have noticed this seems to be more a problem with thick, coarse hair as the returns are not fine and soft enough to fall flat. When using European human hair, this is less of an issue as the hair is finer and softer. It is a complaint that some wig wearers make because it looks odd (unnatural) and irritating, and I have seen people requesting 4 inch returns when they order a full lace wig from China to try to combat this. In theory, as I said before, if the cuticle has been entirely stripped away, this might work okay, but if the cuticle is there, you would risk matting and tangling issues. This is because the cuticle on the hair shaft is like a load of tiles on a roof. When the cuticle is closed and the hair is healthy, the tiles lay fairly flat, but when the cuticle is opened or damaged, some of the tiles stick up. On normal hair growing out of the head, all the strands of hair have the cuticle facing the same way - downwards. When you ventilate hair onto a wig, assuming you have cuticle intact hair that has been kept with the root-to-tip the correct way up, you end up with the long main part of the strand hanging with the cuticle as it would be on your head, downwards; however, on the return, the hair strand is now upside down with the cuticle facing upwards.


If the cuticle opens up (say when you use hot water or a deep heat treatment on the hair) or becomes damaged, then the parts of the cuticle hanging downwards can snag against the return which has the cuticle facing upwards and cause tangling or matting issues. As a result, a shorter return is preferable to a longer return as there is less return length to tangle and snag against the main hair strands on the wig.

Question:

Also, how much hair is needed normally for a lace front wig? (100-120% density)

How much hair you will need depends on how long the hair is, as even for the same density, the longer the hair, the heavier it will be.

Length - remember that you will lose at least 1 inch for the return; however, I bank on losing 2 inches (I am a cautious person). Then, you need to take into account whether you will want to have the wig cut after you made it. If you do, you will lose maybe another inch or two. So if I want to make a wig that is 12 inches long, I would buy a minimum of 14 inches, maximum 16 inches in length.

To get a length of 14 inches, to be cut down to 12 or 13 inches finished length after styling - I personally would be looking to buy between: 170/180 grams (14 inches) to 190/200 grams (16 inches) of raw, bulk hair. This is about 6 to 7 ounces. I like to allow for a little wastage, so would tend to round up rather than down. With a bulk hair vendor, you can usually buy in small increments - certainly in the UK you can buy by the 10 gram increment.

I have tried to think how to make some kind of formula for this. The best I can come up with (I hope this works! BUY AT YOUR OWN RISK - double check with the hair vendor, as they should also be able to advise how much you need) is:

For every increase of 2 inches, add 20 grams, for every decrease of 2 inches, remove 20 grams. This is approximate, it depends on the thickness of the hair (think about it, if the strands are finer, you will get more strands than if they are thicker!). The range gives you a little adjustment because if you end up with raw ponytails, you may find you cannot add them together to weigh exactly 160 or 220 or whatever. I would tend to favour the upper number, better to have too much than too little and, in my case, I have a big head so more foundation to cover (hehe).

10 inch wig: you would need at least 12 inches of hair, you would want to order 150/160 grams.
12 inch wig: you would need at least 14 inches of hair, you would want to order 170/180 grams.
14 inch wig: you would need at least 16 inches of hair, you would want to order 190/200 grams.
16 inch wig: you would need at least 18 inches of hair, you would want to order 210/220 grams.
18 inch wig: you would need at least 20 inches of hair, you would want to order 230/240 grams.

Converter: http://www.metric-conversions.org/weight/grams-to-ounces-table.htm

Generally, if you are buying bulk hair from a supplier like De Meo Brothers (US) or Hugo Royer (UK), it is a good idea to buy a little extra hair for repairs and/or in case you misjudge how much you need. The upside being, the more wigs you make, the more hair you will have in stock (assuming you don't use all the hair each time you make a wig) and you can eventually gather compatible colours together, and blend them to make a hair piece or wig if you want to.

Density - If you want a heavier density wig, then add on another 25-30% so:

Medium density weight x 1.25 (to add 25%)
Medium density weight x 1.30 (to add 30%)

I hope this helps.

Disclaimer: Buy at your own risk. I accept no responsibility for these numbers being inaccurate!

Thursday, 20 December 2012

Wig Grips - part two: A Review

I originally decided to buy the Milano WiGrip; however, I ended up buying The Hair Grip as this was the wig grip that my friend tried.

Product: The Hair Grip
Website: http://www.thehairgrip.com/Home.html
Colour: Dark Brown (black is available and nude will apparently be available soon too)
Price: $20 for one, with discounts for American Cancer Society Patients and those buying 3.

Buying from Abroad - the shipping was incredibly reasonable and speedy. As someone from the UK who buys from the US a lot, I was really impressed by the shipping costs for this item.

Packaging and Information - the product was well packaged, and included an information leaflet on how to use/wear the Grip and how to care for it. The website is well designed and informative with a couple of video tutorials.


Construction/Quality - The Hair Grip appeared well made and looked smart (not that anyone sees it!).

This product is designed to be worn with head covers or wigs.

Use with Wigs - I found the Grip gives a reasonable amount of security when wearing it under a sheitel (regular style, closed wefted wig with a silk top and no lace front). Its main function is to prevent the wig from slipping. Initially I found it worked very well for stopping the wig from slipping backwards as I moved about, or from moving when I bent down or forwards. It is a pleasant feeling to feel that your wig is pretty 'rock solid' and I was confident that if my wig had been pulled on by accidentally getting caught on something or by a child tugging at it, it would not have budged.

The problem I am finding is that with time and wear the grip seem to be provding less adehsion/friction. I am going to wash it and see if the pile of the material (which is the part that is actually providing the friction to stop the wig slipping) fluffs up and grips better again. I will update on this after I have washed and worn it.

Unfortunately, due to the design, this type of grip is unable to address the sideburns/ear area 'flap' that many women who wear wigs struggle with, so it will not stop your wig from flapping around at the sides! The Grip is also unsuitable for wearing with a wig that has a mono or lace top or part line (i.e. a top/part line that shows through to your own scalp/hair) as there would be nothing to conceal the appearance of the Grip showing through the wig foundation (base). This is a shame, as I can imagine a lot of women would love to be able to wear this type of accessory with their lace front and full lace wigs while doing minimal or no bonding (and perhaps using some bobby pins to keep the sides held down). It would work for a lace front or full lace wig that has a silk top, and it would work for the cheaper lace fronts that have only a small inch or two of lace before the wefted top starts, as well as for the cheaper plastic skin top type synthetics.

The Grip itself is fairly comfortable, as the material is very soft. Potential issues with wearability and comfort stem from the fact that the Grip can be a little itchy (as can wigs), a bit hot, and a little bulky. The design is such that you have two open ends on the band at the back of your head and these ends have large velcro areas stitched to them. This enables you to adjust and close the band at the optimal point for your individual head size. Where the two ends overlap is quite bulky, and depending on where you place this between your occipital bone and your nape, it may or may not poke the back of your wig out a little. You also have to be careful not to tighten the Grip too much when putting it on, as this can cause headaches (both myself and my friend found this). The Grip needs to be firmly fastened so that it does not slip back on your head (and ping off!), but not too tight so as to cause discomfort.

As such, I have found that The Hair Grip requires a little practice to get right. You have to work out where is the best position for you to place it so that your wig holds on, the Grip does not move and you do not have a bump. There is a related issue at the front - in my case, if I place the Grip too far forwards, I raise the profile of my wig too high so that the front edge of it is not flush to my scalp. I am unsure if this is a problem for me because of my head shape and whether other women would not experience this issue. I tend to place my Grip a little further back than I would have thought would be correct. I do find that it still raises the profile a little, but it is definitely not as bad. I think this issue is compounded by the fact that I still have the wire zig-zag comb at the front centre that the sheitel came with. Although I do not use this comb, I have yet to remove it. I believe that because the comb is stiffish (as it is metal), this may be preventing the wig from laying as flat as possible and flush to my scalp. Again, I shall report back once I have removed that comb and see if it is any better.

I am slightly concerned that the Grip is stretching over time. I think that this is inevitable with the material it is made from. As it is not too expensive, I think I will be budgeting to buy 1 every 6 months.

Use with Head Covers - I have found the Grip is excellent when used with slippery scarves such as satin and silk material. It not only helps when wearing them, but also when tying them as it provides enough friction to stop them from slipping. I would not wear a silk or satin scarf without the Grip now as it is that good for this purpose.

Overall:

I definitely think it is worth getting one to try and see how you find it. For me, it has become a good accessory for wearing with wigs. I wouldn't say it is perfect and has resolved all my problems with wig security, but it is good enough that I feel more confidence when wearing my wig out and especially around children. I am not sure how well I will manage in the summer, as the Grip and my wig sounds like a pretty boiling hot combination; however, for Autumn (Fall) through Spring, I can see it being used every time I wear my wig. I give it 4/5 for wearing with wigs.

When it comes to head covers, I feel the Grip really comes into its own. For those women with alopecia who do not like wearing head covers, especially scarves, because they feel that the material sits too close to their scalp and thus shows that they are bald underneath, the Grip is a good choice. It helps to add a little bulk there, as well as giving an unparalleled feeling of security to traditionally slippery materials such as satin and silk. I give it 5/5 for wearing with head covers.

Tuesday, 11 December 2012

Wig Grips - part one...

Today I want to talk about something partially related to wig making, but perhaps of more interest to the wig wearer. As I am both a maker and a wearer, matters relating to both are relevant to me.

Wig grips.

I find it amusing how the latest new thing (or fad), just springs onto the market and within a short time everyone is talking about it. It happened with full lace wigs, then with silk tops, and I have later watched as the wig grip emerged and this process also happened.

I might be wrong, but I get the impression that the Jewish sheitel (wig) company Milano were the original company to produce a wig grip. Theirs is called the WiGrip. Now more and more wig companies seem to be bringing out their own versions under different names and selling them as an accessory. Essentially they all seem to be exactly the same design:

Some form of velour (a bit like panne velour) in a headband shape that is doubled - 2 - layers (so that the pile of the velour is on both the top and underside of the headband), and the band is closed with adjustable velcro ends. It is seamed on both sides with an overlocker, and quilted across the middle to keep the two layers tightly bound together.

The idea behind this is to facilitate the easier, securer and more comfortable wearing of wigs. The fabric's pile on one side creates a degree of friction between itself and the inside of the wig base, at the same time as creating friction between your hair or scalp and the band. Thus preventing the wig from moving around and providing the 'grip'.

I saw a couple of alopecia ladies wearing them. Then my best female friend got one and I knew I had to try it. When I got my new wig, it seemed like a perfect time to try one myself. In my second post on this theme, I will write a review debating the pros, cons and effectiveness of this accessory.

Thursday, 26 April 2012

Update Pictures

Finally I have time to do this and post. Things in my life have been very busy and somewhat difficult/challenging, so I don't really have much time to do my usual work. Anyway, I have spent the past couple of weeks trying to get an hour of ventilation done 5 days a week. I have really gotten back into the swing of things. I want to get this thing finished! It feels as if it is never ending - having a big head and making an extended nape doesn't help for sure.

Here's the wig:


And the hair...


As I have said before, the hair is not the best. It's really bad hair in my opinion; highly processed and loads of different hair textures (some are horrible and I try to throw before ventilating if I see them). However, it is serving it's purpose of giving me something non-precious to ventilate with for practicing. The hair type is 'pouffy' in that it looks more than it is. When I braid the hair that I have already ventilated, it's not as thick as you would imagine from looking at it hanging down like that.

Moving forward...

I am going to continue ventilating as I am already doing and then when I have ventilated over the the top galloon, where the honeycomb tulle finishes, I will then start ventilating 1 hair per hole.

There is one patch at the bottom right hand where there is not enough hair ventilated and when I have finished doing the current section, I will go back and add some more to that before I move onto doing the vertex and sides.

I also need to buy some metal springs as I don't like the plastic ones I have and I want to add some to make ear tabs.

Friday, 10 February 2012

Mini Challenge & Eventual Wig Cutting and Styling

I did some ventilation today in the comfort AND WARMTH of our office/studio room. It's far warmer in there than in the house right now (don't even ask!). We are still getting snow. Brrrr.

So I was looking at my wig block... and I keep moving a small pin up the back of the head and aiming for it, but it's like moving the goalpost... so I never quite get there! A while ago, I set myself the challenge of doing x amount of ventilation by a certain date. I can't even remember if I succeeded.

Anyway, on to my point. So I have decided that tomorrow I am going to go in the studio and create a new sparkly marker with a heart shaped pin (more visible that way) and set myself a target of ventilating to that pin by a certain date. I shall document it on here with some pictures... I like to challenge myself and motivate myself... no one else is going to!

I also think it is really important to set yourself targets with the wig making, otherwise it is easy to stop or to get bogged down and progress becomes really slow. I want to get this finished so I can move onto the next project! I have lots of wigs and hair pieces I eventually want to make.

My second topic of the day is: cutting and styling...

As I have a type of alopecia that results in partial hair loss, and I am not currently shaving my head, I still need to get my own hair cut/styled so that when I am around the house, I don't look a complete fright! I have a really nice stylist who does this for me; she runs her own salon. I have been talking to her about my wig making and she has agreed to cut the wig for me when I finish it. I think it will be a good experience for her and for me. If the wig doesn't fit me properly, I will get her to cut it on the block, otherwise I will get it cut on my head.

Have a great weekend y'all.

Monday, 16 January 2012

A Quick Update

I have to admit to having had a few rest days recently. For a while there, I was going for gold and doing some work each day on the ventilation. However, I caught some 'bug' or fluey cold thing and eventually had to just take a proper time out to recuperate.

The good news is that I am slowly on the mend. Unfortunately - due to medical reasons - I tend to take a while longer to shake viruses off than the average person. So finally today, I picked my needle up again and indulged in a little knotting action.

I am hoping tomorrow to get down to it properly and put a few hours of hard work into it. I shall take another set of updated pics because I will have progressed to working on the honeycomb tulle - by itself - section and will be figuring out density.

During my down-time, I have continued to experiment with styling techniques. I did a whole tutorial on Wigs and Head Covers on how to do pin curls on a wig. I acutally used the section of hair I have added on the wig I am making as my demo wig hair - it was useful as not too much hair to lose clarity for close up pictures of what I was doing. So I had a go at doing them on a shorter wig. I realised that I prefer the effect on longer wigs - so hair that is approximately 12 inches or longer. I don't really like the way they come out on shorter wigs as you don't get enough 'repeat' of the curl or wave.

Here's a few pics of my experiments with shorter hair...

I prefer the end result on longer hair - this was showing half a section done, and I had only left it for about 2 hours to set (normally I would leave it overnight):
The good thing about pin curls is that I don't need to use any heat to do them. For me, learning to style wigs is equally as interesting as learning to make them. I am very much a person who enjoys working with hair - no matter what... so I guess I will be doing more of these experiments in the future!

Wednesday, 11 January 2012

Video Update

For anyone who does not find this blog from my YouTube channel, here's my latest video:


Wednesday, 4 January 2012

Ventilating - Step 1 ~ The Extended Nape

The past couple of weeks have seen me finally getting time to set to and start ventilating. It's great - I really enjoy it and I find it very relaxing. However, let's be frank for a moment... Boy oh boy does it take a long time! I know I am not 'up to speed' yet; I can feel each time I pick up that needle holder, that I am getting into the process and the rhythm quicker than the time before, which is progress.

As one would normally ventilate a wig from the nape upwards, I have been focusing on the extended nape to begin with. Admittedly, it will take me longer to ventilate this wig than if I were making one without an extended nape, as that extension is a good deal more hair to add than if it were not there. This is compounded by the fact that the lace I used in that area is very fine (lots of tiny holes). It would be easy to add way too much hair there! As I do not want to end up looking like Cousin Itt: http://tinyurl.com/7qw6j6o, I decided to go light on the ventilation. I would say the first inch is probably what most people would term light density and the rest is very light. I am realising that I truly am a less is more hair wearer. The pictures I am showing are from a little while ago, as I have actually now finished this section (and will post more up-to-date pics shortly). So what you see is the more densely ventilated area at the bottom, starting to lighten out towards where the honeycomb lace starts.


I have plaited/braided the hair to keep it out of the way while working. At this stage it seems easier to plait/braid it, than to try and use clips, which get in the way as I have not worked a large section. When I take the next round of pictures, I will be sure to photograph the hair loose, so you can get an idea of the amount that has been used.

To be honest, I do think that at this stage there is a real art to getting density right. It is hard to judge! I have been trying to think about my own hair and how that looked before I had any hair loss. The hair I am using is not good hair - it is processed and a mixture of strands, it is naturally wavy and I know it would be really easy to put too much in, as my own hair strands have always been finer than this. So... with that in mind, I am trying to achieve coverage (of the foundation) without over-dense ventilation. I keep reminding myself that this whole process is me learning and mistakes are allowable.

A tip - if you are ventilating a lot, find a movie or some music (or something!) that you can listen to. I really think it helps to keep a rhythmn and to just get into the zone. I have been ventilating to DVDs, the radio, tv shows. I even ventilated to all 3 Lord of the Rings movies - strangely inspiring and motivating seeing as so many of the characters on there are wearing lace front or full lace wigs!


Thursday, 22 December 2011

The Next Step - Sorting out the hair...

The next step in the wig making process, for me, is ventilating the hair onto the main body of the wig. In order to do this one needs some 'spare' hair. Beyond deciding such things as - the hair origin (European, Chinese, Indian, Mongolian etc), hair type (virgin, cuticle, processed), hair texture (wavy, straight, curly, body wave etc) and length, you have a few choices. You can either use hair you already have (old wefts, old wigs etc) or buy some new hair (either as wefts or bulk/raw hair in ponytails). As mentioned in my last blog post, I already had some masses of hair on the most ridiculous wig known to man. Due to my novice status, I decided that this was the msot appropriate hair to use. I think that in the earlier stages of wig making it is probably a better idea to use less expensive hair. Then if you go completely wrong, you won't be as devastated as you would if you were using virgin cuticle European hair, for example.


Side note - I do have better hair - raw and wefted, which I hope to use later when I am more proficient. Certainly if I were choosing hair, I would be inclined to go for raw ponytails of caucasian/European origin - because that texture is the same as my bio hair.


As the hair is already attached to a wig, I set about the process of brushing the wig out, separating the hair and removing some. I decided that first separating the hair in half (to effectively create two 'tails') was a good idea as there is about twice the amount of hair I want in my new wig. On the left hand side you can see half the hair has been braided; to keep it neat and out of the way. The right hand side represents half the hair and is what I am going to use on this wig.


You can see just how much hair is in half the wig in this next picture, where I am holding that braid in my hand.


At this point I have the half, to be used, hanging loose ready to be sorted.


As the hair is already ventilated onto this wig, I don't want to just cut it off as a ponytail/braid. If I did this, I would lose a lot of the upper length. In order to keep this length, I need to remove the hair in the stages I am going to use it. As most people start ventilating at the bottom of their wig foundation, I need to take the bottom lengths to use on the bottom of my wig foundation. So, I braided the rest of the hair and only left free the part I want to remove from the bottom right hand nape.


I then clipped this braid up. The hair hanging down is only half of the hair at the bottom of the nape of the wig.


I have drawing cards ready to place the hair into (they are the flat brown and grey squares to the right of the wig two pictures above). This helps to keep the hair neat whilst I am ventilating and enables me to remove small amounts of hair to work with. If you do not have drawing cards and get a pair, remember to write "Root" on one end of them (I wrote it on both sides) so that you know which way up your hair is! You put the loose hair into the drawing cards with the root end of the hair at the end you have designated "Root" and the tip should be hanging out the opposite end. This enables you to keep it cuticle correct. 

I carefully cut sections of the loose hair away. I tried to keep fairly near to the wig cap so that I could keep most of the length. I just used regular scissors for this.


Then I placed the hair in the drawing cards.


After I close them up, I always put an elastic band around them. That way, if I (or anyone else!) ever knock them onto the ground, they won't fall apart and ruin the hair (because if the hair gets mixed up, it won't be cuticle correct anymore).


Now I am ready to start ventilating.

Lastly, I want to wish those celebrating Chanukah:

חנוכה שמח

Here's my donuts, that I made:


For those of you celebrating Christmas in a few day's time...

Happy Christmas! 

I will be back with more pictures soon!


Tuesday, 7 June 2011

Learning To Make The Top - Vertex and Crown

After I spent some time just practicing ventilation - single and double knots - on small pieces of tulle, I decided that a good mini-project to get me started would be to learn how to make the top of a wig. This would also constitute valuable practice at making a topper or closure as essentially such hair pieces cover some of, or the whole of, that area.

Ventilating technical issues with making the crown and the vertex, in my opinion, centre around the following:

  1. Realistic flow and placement of hair at the crown and "corners" of the rear vertex, in order to simulate bio hair growth
  2. The part line being realistic
  3. Establishing the correct density for the individual - not wanting it too "pouffy" or "wiggy"
  4. Graduated density at the front hair line
  5. A hair line that is not too 'perfect' or moon-shaped looking
  6. Neat, small knots
So far I have managed to conquer number 1 and number 3. I am getting there on number 4, 5 and 6. Number 2 is harder at this stage. I am still working out how to make the part line how I want it. I would ideally like to do a drawn through part line. I don't mind having a fixed part line at this stage, as I think doing an entire drawn-through vertex would be too ambitious and a lot of work. 

So here's some pictures of the WIP (work-in-progress) -


I have actually nearly finished it, so I will post pictures of the final piece shortly. 

This work was done on the styrofoam head as I had yet to purchase the canvas wig block. The hair piece is made using tulle with blue paper underneath to highlight the tulle/hair and to reduce eye strain. It has double knots in the lower back portion & single knots on the rest. I used a mixture of a #1 and #2 needle - the #1 is perfect for doing single hair knots and the #2 is good for picking up 2 hairs for the lower back where you might want more density. 

The hair used was cut from the wefts of an old processed human hair wig. The downside of using this type of hair for practice and/or for making an actual wearable hair piece or wig is that it can be variable in thickness, strand colour and durability. Some of the strands in the hair I have been using are very thick and dark, others are incredibly fine and almost translucent, while the rest are more what I would call normal. When ventilating using the very thick or fine strands, there can be quite a bit of breakage, so I have tended to bin those hairs. I would certainly not use hair like this to make anything other than a practice piece or practice wig. The hair quality is extremely poor and it is not worth the effort to hand tie all this hair for actual wearing! However, I would definitely recommend using hair like this to practice with at first. Later you might want to switch to a hair type that mimics or is the same as what you will be using to make your first wearable wig or hair piece. For example, I want to ultimately use caucasian or European hair, so at some point I will switch to that in order to get a feel for it. It is much finer than the hair I am currently using and I will, most probably, need to use a very small/fine needle. I will also experiment with Indian remy hair as this is another hair type that I would like to use.