Showing posts with label how. Show all posts

Thursday, 17 January 2013

Wig Making Questions: Ventilating Loop, and How Much Hair Needed?

I had a question from a reader asking about ventilating and the amount of hair needed for a wig.

Question:

I know that you're supposed to loop the hair between your thumb and index finger before you begin the ventilation process... I was wondering if the loop is supposed to be even meaning if the hair is 24 inches long originally, will it be 12 inches as you ventilate it or does it not matter?

For total beginners - When you ventilate you need to create a curve (loop) in order to catch the hair in the ventilation needle, which means you can then pull it through the lace hole and do your knot. This is achieved by folding over the top of the length of hair where the root end is - remember the hair you buy and use needs to be cuticle correct or it will tangle and matt up when the wig is worn/washed.

To help keep your bulk, raw hair organised, use a pair of drawing cards. Write 'root' at the top, and always place the hair you are using with the root end lying at the end marked root on your drawing cards. You should be able to tell the root end when you buy the hair, as the hair is usually bound more strongly and obviously at the root end. Depending on how the hair was collected, you can also tell by looking at both ends: one end will normally look 'cut'.
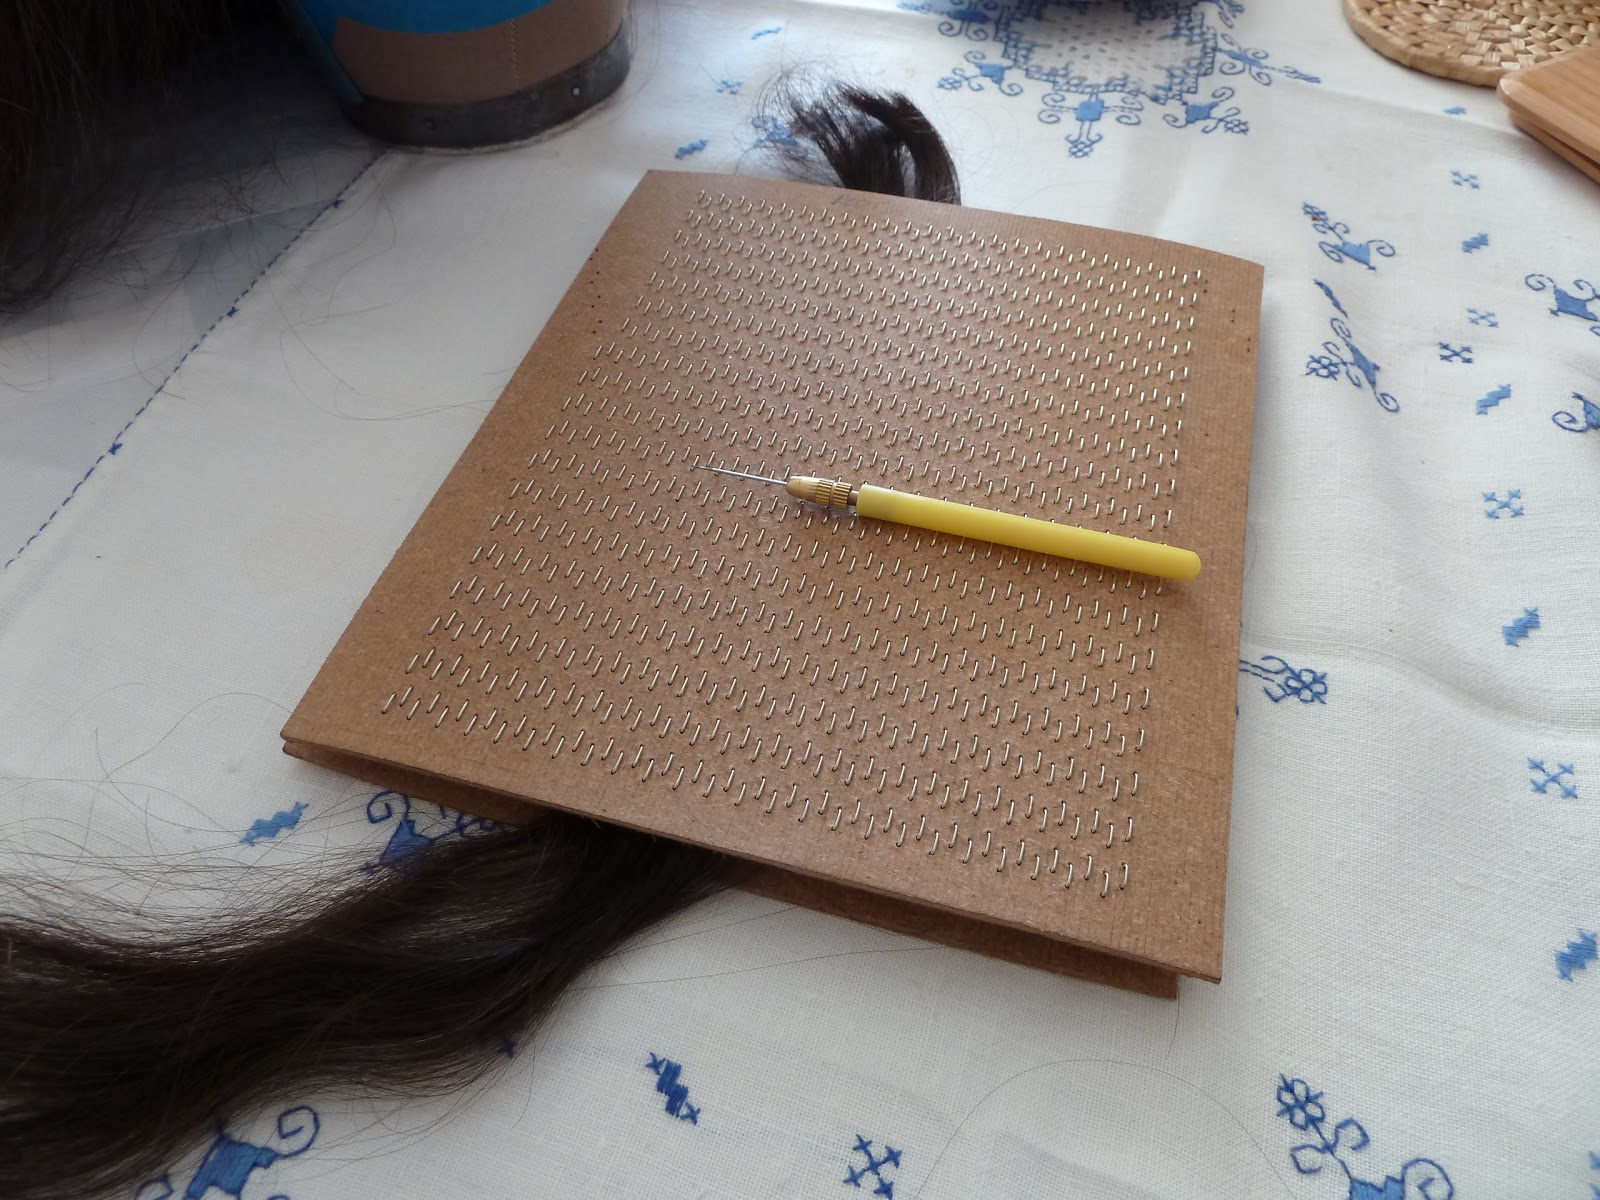
Drawing Cards
Tip: Hold them together with an elastic band or a pair of clamps. If the cards fall on the floor, they may fall apart and all the hair get mixed up in different directions, which would make the hair unusable. 
Root End Marked
 Drawing Cards - The 'Teeth' Hold the Hair in Place and You 'Draw' a Small Amount Out to Ventilate

In answer to the question - Firstly, it should not be even. It depends on the hair used. With processed hair, you can generally get away with longer returns if the cuticle has been completely stripped away (of course it is hard to know whether this has been done or not!). With cuticle intact hair one is aiming for a fold (return) of about 1 inch. Of course this is not a completely exact science, so somewhere around that length should be okay. In my case, I am aiming to do a 1 inch-ish return and this is what I would advise people to do unless the hair is heavily processed and very coarse, thick strands. A good way of judging how it will look is to take a scrap piece of lace, then ventilate about 20 hairs in two 10 strand rows, and just see if the returns are poking up.

 Hair Folded Over to Make a Return

The Loop - this is the holding position for ventilating. Hold the folded loop together between your thumb and index finger. Then draw hairs from the loop through your lace, monofilament or tulle.  
Tip: don't take too much hair at a time from your drawing cards or you might get finger fatigue from trying to grip it all! This also helps to prevent hair wastage when learning, as you may drop some or find it gets caught up and need to chuck it in the bin if the root to tip becomes mixed up.

One problem with returns is the 'salute' you issue - where the returns stand up and poke out of the ventilated hair like a load of regrowth or broken hairs. I have noticed this seems to be more a problem with thick, coarse hair as the returns are not fine and soft enough to fall flat. When using European human hair, this is less of an issue as the hair is finer and softer. It is a complaint that some wig wearers make because it looks odd (unnatural) and irritating, and I have seen people requesting 4 inch returns when they order a full lace wig from China to try to combat this. In theory, as I said before, if the cuticle has been entirely stripped away, this might work okay, but if the cuticle is there, you would risk matting and tangling issues. This is because the cuticle on the hair shaft is like a load of tiles on a roof. When the cuticle is closed and the hair is healthy, the tiles lay fairly flat, but when the cuticle is opened or damaged, some of the tiles stick up. On normal hair growing out of the head, all the strands of hair have the cuticle facing the same way - downwards. When you ventilate hair onto a wig, assuming you have cuticle intact hair that has been kept with the root-to-tip the correct way up, you end up with the long main part of the strand hanging with the cuticle as it would be on your head, downwards; however, on the return, the hair strand is now upside down with the cuticle facing upwards.


If the cuticle opens up (say when you use hot water or a deep heat treatment on the hair) or becomes damaged, then the parts of the cuticle hanging downwards can snag against the return which has the cuticle facing upwards and cause tangling or matting issues. As a result, a shorter return is preferable to a longer return as there is less return length to tangle and snag against the main hair strands on the wig.

Question:

Also, how much hair is needed normally for a lace front wig? (100-120% density)

How much hair you will need depends on how long the hair is, as even for the same density, the longer the hair, the heavier it will be.

Length - remember that you will lose at least 1 inch for the return; however, I bank on losing 2 inches (I am a cautious person). Then, you need to take into account whether you will want to have the wig cut after you made it. If you do, you will lose maybe another inch or two. So if I want to make a wig that is 12 inches long, I would buy a minimum of 14 inches, maximum 16 inches in length.

To get a length of 14 inches, to be cut down to 12 or 13 inches finished length after styling - I personally would be looking to buy between: 170/180 grams (14 inches) to 190/200 grams (16 inches) of raw, bulk hair. This is about 6 to 7 ounces. I like to allow for a little wastage, so would tend to round up rather than down. With a bulk hair vendor, you can usually buy in small increments - certainly in the UK you can buy by the 10 gram increment.

I have tried to think how to make some kind of formula for this. The best I can come up with (I hope this works! BUY AT YOUR OWN RISK - double check with the hair vendor, as they should also be able to advise how much you need) is:

For every increase of 2 inches, add 20 grams, for every decrease of 2 inches, remove 20 grams. This is approximate, it depends on the thickness of the hair (think about it, if the strands are finer, you will get more strands than if they are thicker!). The range gives you a little adjustment because if you end up with raw ponytails, you may find you cannot add them together to weigh exactly 160 or 220 or whatever. I would tend to favour the upper number, better to have too much than too little and, in my case, I have a big head so more foundation to cover (hehe).

10 inch wig: you would need at least 12 inches of hair, you would want to order 150/160 grams.
12 inch wig: you would need at least 14 inches of hair, you would want to order 170/180 grams.
14 inch wig: you would need at least 16 inches of hair, you would want to order 190/200 grams.
16 inch wig: you would need at least 18 inches of hair, you would want to order 210/220 grams.
18 inch wig: you would need at least 20 inches of hair, you would want to order 230/240 grams.

Converter: http://www.metric-conversions.org/weight/grams-to-ounces-table.htm

Generally, if you are buying bulk hair from a supplier like De Meo Brothers (US) or Hugo Royer (UK), it is a good idea to buy a little extra hair for repairs and/or in case you misjudge how much you need. The upside being, the more wigs you make, the more hair you will have in stock (assuming you don't use all the hair each time you make a wig) and you can eventually gather compatible colours together, and blend them to make a hair piece or wig if you want to.

Density - If you want a heavier density wig, then add on another 25-30% so:

Medium density weight x 1.25 (to add 25%)
Medium density weight x 1.30 (to add 30%)

I hope this helps.

Disclaimer: Buy at your own risk. I accept no responsibility for these numbers being inaccurate!

Monday, 14 May 2012

How to get started in Wig Making (and an update)

I had a comment to my last post by Biodagar asking:
I'm super keen to learn wig-making, but I don't know that I'd have the patience for it. :) Do you mind if I ask what the first resources you were looking at when you started? I wouldn't even know where to begin :)
I totally know how hard and daunting it can be to get started with this process. I think it took me about 6 months to get properly started. I did a lot of research on the products/items needed and on cap construction. I think that to make wigs for yourself, you have to have an understanding of what you want/need and to look at wigs you already have so you can start to understand about the way that wigs are constructed. Even with full lace wigs, there are a lot of variations in bases. If you have a wig design that you really like, you can always attempt to copy its construction. Here's my suggestions for the 'short-cut' way of getting started:

First off...
  • Have a look at the posts I made when I started the blog:
http://makingwigs.blogspot.co.uk/2011_05_01_archive.html - the 2nd post shows you basics needed to get started
http:// makingwigs.blogspot.co.uk/2011_06_01_archive.html. - you will get a general idea of what you need to start to do
The first thing you need to do is learn to ventilate - there is a simple video showing how to do it: http://www.youtube.com/watch?v=eWqGTzj3y14&feature=related. For this process, you need to buy some lace (or you can use tulle from a sewing/craft store when you are just practicing), some hair (cheap wefted processed hair will do), a ventilating needle and a holder. You will also need at least a styrofoam head or preferably a canvas wig block. Once you have learnt to ventilate, you can start learning to make a foundation (wig cap/base).

To make the wig foundation/base - you will have to do research into cap styles. Look at any wig books you can get your hands on. Look at the bases offered by Chinese wig making factories (they usually have lots of pictures showing what's available for custom orders). Have a look at what other people are making on You Tube and blogs like mine. If you already have some wigs, turn them inside out and study the bases. You may wish to take old wigs apart to learn how they are made and perhaps reuse some of the materials and/or hair while you are learning.

An important part of making a wig foundation/base is sewing. If you have no sewing skills, then now is the time to learn them. My first 2 caps (the prototype and the one I am currently ventilating onto) were totally hand sewn. You can find more information on hand sewing wig foundations in the book I recommended above. While hand sewing takes a long time, it is also very satisfying, a traditional way of making a wig foundation and if you are a perfectionist like me: very neat! In the future I will be experiementing with using a sewing maching for all or part of the wig foundation. Even if you choose to use a sewing machine, you still need to know how to use that, so if you have zero sewing experience I recommend having a look in some books and on You Tube again and learning a bit about stitches and methods of sewing.

I hope this was helpful.

Update:

It has been just over a year since I started this blog - amazing how time flies. For the reply above, I was looking back at old posts and I can see how far I have come in that time. I am really proud that I have done this all by myself. Where there is a will, there's a way. I must give credit to the few mentors that I have consulted during this time - particularly to one person from Greece... you will know who you are. I appreciate the advice and answers to my questions that have been given and I hope that as I improve I am able to help other people in the same way. Pooling our knowledge and resources is definitely helpful.

Having seen my pictures from the last update, I realised how far I have come in the ventilation. I have done loads since then. A couple of weekends ago, I made myself a little timesheet to fill in with my wig making hours. I hoped this would encourage me to get more done. It worked. I did 13 hours last week. I shall take some pictures and post them so those of you who are interested can have a look.

Monday, 30 January 2012

The Wooden Wig Cradle & An Alternative! Plus, needle safety...

A few posts ago, when I was talking about ventilating position, I mentioned the wig cradle. It is made from wood and looks like this:

For those of you who are interested, it can be purchased from the wig making supplier, Banbury Postiche: http://www.banburypostiche.co.uk/shop/home/C-264.aspx
They are located in the UK and do ship abroad, although you may need to email them for a shipping quote due to the bulkiness of the item.

For those of you who do not want to purchase one or, as in my case, do not have the funds to spend on one (I need to save the money for other things!), I have come up with a pseudo wig cradle idea....

I use a stiff cardboard box! I have two of differing sizes; both of which were originally packaging boxes for items I had bought from stores. They are stiff sided (corrugated cardboard perhaps?), which helps to keep the wig block stable and the box rigid.

Block face down - so I can work the back and crown


Block standing up - suitable for working on a hard surface like a desk or table when ventilating the top/vertex


Block on the side - so I can ventilate at this angle


I also have another box like this that is a little narrower. Of course, if I wanted to, I could cut the V shapes into the ends, but I find that the block rests okay in the box as it is and does not move around. I then use the box on my lap (sometimes raising the height if necessary by putting a cushion under it). I don't always use it, but I found it particularly helpful for ventilating the first few inches of the nape. It is also useful to safely store your ventilating needle, comb and scissors should you be called away from your work (e.g. if the phone rings). On that note...

Ventilating needles are quite dangerous as they have a catchy hook in them, which is designed to catch the hair in so that you can knot it. Unlike a crochet hook, which has a rounded end to the catchy part of the hook, a ventilating needle is quite sharp. It can catch soft furnishings, clothes and skin. I am always really conscious of this around pets and small children. One aspect I had not thought about at first was how dangerous this needle/hook can be around eyes! It would be lethal if the needle got stuck in someone's eye as removing the catchy part of it (which gets stuck in things) would cause untold damage. For that reason I urge anyone reading this who is thinking of ventilating or already ventilates wigs to please be very careful with the needles. Wearing glasses is a good way of protecting your own eyes, but remember the eyes of pets and children and other people around you.


Sunday, 29 January 2012

Progress in Pictures

Last time I posted, I was at this stage:


Here is my latest update on wig making progress...


I am continuing to keep the density light and will progress to light-medium by the time I am an inch or two below the crown. I am pleased thus far! P.S. I just realised I did not take the picture of the "alternative wig cradle" as I had promised to do in my last post... so I will definitely go do that and will add it tomorrow.

Thursday, 19 January 2012

Dark Hair Contrasting Against Wig Block - Thoughts...

I watch Jamesgirl37 on YouTube, if you haven't seen her channel, then check it out:

http://www.youtube.com/user/jamesgirl37

Anyway, she was talking about using white paper or tissue (or something white) on the block to get a better contrast between dark hair, lace and the block when ventilating. Everyone has always seemed to favour using blue tape. I do find blue tape quite good - especially useful for creating patterns, markings and instructions on the block, which you can remove easily once you are done (as you peel the tape off and just reapply some new to re-cover it). So Jamesgirl's got me thinking about whether I will try using something else... I have cream masking tape, which I could try. I have used paper before, but I find it does not work well for a wig - it's fine for toppers, closures or just practising in small areas. I do sometimes find it hard to see the knots, but I think this is more related to when I have insufficient light. As soon as I aim a bright beam of light onto my work, my eyes seem to see a lot clearer. Anyway, if I do experiement, I will be sure to document it.

Later today, I shall take a picture of an alternative wig cradle solution - to save money - that I have been using and will post that next time I write here.

Monday, 9 January 2012

Working Position - Ventilating Position

I thought it would be a good idea to talk about the importance of having a good working position or ventilating position. I touched very briefly on this issue a while ago in this blog, but I have done enough of my own work now to be able to comment more in depth on it.

Obviously wig making is a time consuming activity to engage in and because of the nature of the beast you can find yourself sat for incredibly long periods looking at something in very minute detail. This type of work can have quite a negative impact on your body if you are not careful and mindful. There are several things to think about:

1. The position you sit in
2. Your eyes
3. Breaks

The position you sit in to work - I have tried quite a number of positions now, ranging from the obvious one of sitting at a surface such as a table, workbench or desk through to the less obvious of sitting in a squishy armchair with lots cushions and a beanbag to rest my legs on! I also have ventilated in bed, on my bed, sitting on a couch and probably some others I cannot even remember.

One thing I have noticed is that it depends on what type of work I am doing as to which position is more suitable and comfortable. For me, hand sewing tends to work quite well with the block on a clamp at a table/desk/bench or with the block in my lap while I am sitting on the couch or in an armchair with my feet on the ground.

When ventilating, I need to be able to change the position and height of the block more easily and it varies quite markedly as to what angle/height I need the wig block to be at, depending on which area I am working on. For example, if I am working on the right side of the foundation, I like to swivel the block so that this side is primary to me rather than twisting myself to reach it/look at it. In addition, ventilating for long stretches is definitely more comfortable, for me personally, if I am sitting in a comfy seat rather than at a table/desk/bench. So I have been finding it more comfortable to sit with my legs supported by something so I can have them higher up (not on the ground), either resting on a large beanbag or a footstool. That way I can have them bent or crossed and prop the wig block up on them. I have also been using a cushion on my legs and then putting the block on that (the cushion is like the scatter type you use on a couch and is feather, so it moulds to the block shape if I press down on it a little bit and stops it from rolling side to side or away from me).

Side note -  I know I am not the only person who ventilates in a position where their legs are raised (if they are not using a clamp or stand). I once watched a video of a theatrical wig maker who worked by sitting on a high stool with her legs propped up on a high level work surface/bench! The block was placed in her lap. She spent hours ventilating like that - so I guess what works for you really does depends on your body and any physical issues you need to overcome/compensate for (e.g. if you already have a back or neck problem to bear in mind).

If I want to ventilate on my bed, I usually sit cross legged and then rest the block on my legs, again using a cushion to raise the height of the block. I put lots of pillows behind me to support my back and shoulders. You can get a wig cradle to put your wig block in, as this helps to stabilise the block when working with it in a horizontal position. It functions regardless of whether you are working at a table or with the cradle resting on your lap. It looks like this:


Available from Banbury Postiche.

If you are working at a desk/table/bench you may want to get an adjustable chair that allows you to adjust the angle of the backrest and seat, as well as the height of the seat to an appropriate level. Office chairs are good for this purpose. If you don't have one or can't afford one and find you are sitting too low, then use some cushions or seat pads to raise the height of your chair seat. If your work surface (and thus the wig) is too low, then raise the level of the block by using an adjustable clamp or put something large (phone directories, old shoe boxes filled with books) under the block/cradle to raise the height of the block so that it is nearer your eyes/hands. 

To sum up...

- Vary the position you sit in as this can help prevent muscle ache 

- Use props, if necessary, to support your body - e.g. cushions under arms or against your back or under your bottom (!) to raise you to the right height when working at a hard surface or a footstool or beanbag to support your feet/legs

- Ensure your block is at the correct angle so as to prevent neck strain/pain and shoulder tension


Your Eyes - Lighting is important because it can make so much difference to how well you are seeing the area you are working on. I have even thought I was seeing quite well until I turned extra lighting on and then realised that I was actually straining a little bit to see clearly. This is especially a factor if working during the winter or in the evening/at night. You can get specialist daylight lamps and magnifyer lamps that are free standing on a table top, clamp to a surface or are free standing on the floor. If you can't afford one, using a desk lamp to spotlight the area you are working on can be helpful. I sometimes use one like this:


Glasses are another factor - I do think it is worth getting your eyes checked if you have not recently had an eye exam and mentioning the close work you are doing or will be doing. I wear glasses for mild short sightedness and astigmatism. I have noticed that when I am doing any close work (not just wig making, but crafting etc.), if I look up after focusing on an item close-up, I cannot focus properly for distance vision. If I wear my glasses, I don't have this problem, so to avoid eye strain and complete blurriness when I look up, I have been wearing them for wig making.

Use a contrasting backgroung colour to help your eyes see the difference between hair and lace/foundation material. Bright blue paper or blue painters tape helps to create contrast between the lace and hair. This can be very important if you are using less 'visible' hair. For example, I am currently using dark hair against a pale/translucent lace, which is fine if the lighting is good as the dark against light is fairly obvious. However, when doing repair work for someone else, I was working with blonde hair on a translucent lace. The base colour of my block is a kind of of taupey grey and is not very useful for helping anything (dark or light) to show up. In this instance (when working with lighter hair) I would definitely use some kind of brighter colour behind it - the blue works well and is favoured by wig makers. You can cover the block (or styrofoam head if you are using one of those) with it fairly easily or, if you are in a pinch and have some bright blue paper, you can use that by pinning a small section of it to the block or head under the area you are working on. I have used both and they work equally well visually. Although in the long term, the tape works better as you can cover the whole area you will be working on. If you use the paper, it's not practical to cover the whole area as you will find you have pins holding the paper down which get in the way of your work and could potentially snag your foundation.

To sum up...

- Ensure adequate, bright lighting is illuminating the area you are working on
- Create constrast between the hair and lace if necessary
- Wear glasses, if needed, and/or use a magnifyer to prevent eye strain

- Make sure to keep your work close enough that you can see it well - use a cushion, wig cradle, clamp or stand to get the block at the correct distance


Breaks - it is easy to get sucked into the wig making vortex and end up ventilating for hours with no break. It is a good idea to change positions every so often - get up and walk around for a few minutes, have a drink, look at something in the distance (good for your eyes to focus on far away if you have been focusing on close-up work for a while - according to my optician)... stretch! Give your hands a wiggle - they can get a bit stiff (in my case) and sore from holding the hair under a certain amount of pressure and from holding the needle holder. If you struggle to remember to take a break, set a timer to go off periodically.

Wig making should be fun! As it takes quite a long time to make a wig from scratch (especially if you are a beginner and learning how to make the foundation and to get into a ventilating rhythm), it is worthwhile taking a little time to figure out a good position so that you can enjoy many happy, flexible and pain-free hours of wig making!


Saturday, 7 January 2012

New Pictures... Finished the Nape

Here's some pictures to update the blog - I have finished the extened nape. I will perhaps add more hair to the edge (where the galloon is - to conceal it more effectively) and at the end of making the wig, I will ventilate a couple of rows to the inside to help conceal the edges. Sorry they are not the best quality - I shot them with my phone and the lighting was not the best! I think you can get a better idea of density from these versus the braided shots of the post before. There's not as much hair as one might think!


I am now working on the mid-section where I have the wide galloon. In this area, I have lace overlapping tulle, so it's quite hard work ventilating it. The lace holes are on top and small, so I am ventilating into that rather than aiming for the tulle. I hope to finish this section in the next couple of days and then move onto ventilating into the tulle by itself.


Lastly, and for fun, I set the hair I have ventilated into pin curls - they came out well. After I defined some of the frizzier ones a little better:


Wednesday, 4 January 2012

Ventilating - Step 1 ~ The Extended Nape

The past couple of weeks have seen me finally getting time to set to and start ventilating. It's great - I really enjoy it and I find it very relaxing. However, let's be frank for a moment... Boy oh boy does it take a long time! I know I am not 'up to speed' yet; I can feel each time I pick up that needle holder, that I am getting into the process and the rhythm quicker than the time before, which is progress.

As one would normally ventilate a wig from the nape upwards, I have been focusing on the extended nape to begin with. Admittedly, it will take me longer to ventilate this wig than if I were making one without an extended nape, as that extension is a good deal more hair to add than if it were not there. This is compounded by the fact that the lace I used in that area is very fine (lots of tiny holes). It would be easy to add way too much hair there! As I do not want to end up looking like Cousin Itt: http://tinyurl.com/7qw6j6o, I decided to go light on the ventilation. I would say the first inch is probably what most people would term light density and the rest is very light. I am realising that I truly am a less is more hair wearer. The pictures I am showing are from a little while ago, as I have actually now finished this section (and will post more up-to-date pics shortly). So what you see is the more densely ventilated area at the bottom, starting to lighten out towards where the honeycomb lace starts.


I have plaited/braided the hair to keep it out of the way while working. At this stage it seems easier to plait/braid it, than to try and use clips, which get in the way as I have not worked a large section. When I take the next round of pictures, I will be sure to photograph the hair loose, so you can get an idea of the amount that has been used.

To be honest, I do think that at this stage there is a real art to getting density right. It is hard to judge! I have been trying to think about my own hair and how that looked before I had any hair loss. The hair I am using is not good hair - it is processed and a mixture of strands, it is naturally wavy and I know it would be really easy to put too much in, as my own hair strands have always been finer than this. So... with that in mind, I am trying to achieve coverage (of the foundation) without over-dense ventilation. I keep reminding myself that this whole process is me learning and mistakes are allowable.

A tip - if you are ventilating a lot, find a movie or some music (or something!) that you can listen to. I really think it helps to keep a rhythmn and to just get into the zone. I have been ventilating to DVDs, the radio, tv shows. I even ventilated to all 3 Lord of the Rings movies - strangely inspiring and motivating seeing as so many of the characters on there are wearing lace front or full lace wigs!


Thursday, 8 December 2011

The Finished Wig Cap


Good news!


I have FINISHED the wig cap. Yay!


Here's some pics of it just perched on the wig block:


I am really pleased and proud that I managed to get it done. I think some people doubted I would ever finish it! 

As you can see, I have added an extended nape. The reason I have done this is because a. I wanted to learn to do it and see how it turned out and b. because I have very low babyhair and wanted to see if this would cover it - a bit of a prototype/test. If it's uncomfy to wear, I won't add one to the next wig. 

So the next step is ventilation. I shall be using some dark hair - a #2 (I am guessing) that is wavyish. It is currently ventilated into another wig that I have never worn because it is too small and WAY too dense (it weighs about 325 grams, which is approximately 12.5 ounces!!). The hair is not the best quality, so it is perfect for this project. I won't be crying if it all goes wrong! Hopefully it turns out well...


Thursday, 20 October 2011

Finally... Pictures!

Since my last blog post, I have finally gotten around to taking some photos of the work in progress. Hopefully they will be helpful in illustrating what I have been, and am still, talking about and doing.

The update on making the wig foundation (wig cap) is as follows:

In the video I uploaded on YouTube, I was still working on getting the perimeter of lace and honeycomb tulle sewn down. I have now sewn the entire inside edge of the perimeter down, except for the extended nape.


This meant that I could, joy of joys(!), take the foundation off the block and... try it on! It also enabled me to remove the mould I had been using.

Trying it on - this was interesting! I was actually rather nervous about it - all this work so far seemed like a big time and energy investment, not to mention the financial aspect of purchasing all the supplies. Then there is that moment where you think: okay this could go either really wrong or really well. Funnily enough, my mind had not allowed for the middle option of: okay-ish. The result thus far (no hair on it, just the lace and tulle) is that it fits me okay. But - and this is a big 'but' for the perfectionist in me - is not quite as snug as I had hoped for at the front. I think for a first attempt it has been a good learning curve thus far and that it is a good outcome.

One thing I do know, is that undoubtedly I will have to use something at the ear tabs/sideburns area as it is too flappy. Those of you who have worn or tried on lace front wigs or glue-less lace wigs, will know exactly what I mean by that. This issue is compounded by the fact that the lace I have used is so fine and soft that it lacks any inherent structure. I shall have to look at how I can add more support and structure to that area. So far I have been thinking to add some wig springs (of the metal variety), but I am also looking into an alternative form of combs to the ones I have tried. I would not mind using combs if I could get them to grip my hair there. That is a big 'if', as up till now I have had no luck in that department due to a combination of a loss of density of my bio hair there and my hair being now very fine and slippery in texture. Ultimately, if I have to, then I will tape it down at that point, but of course I would rather not do this.

My next task is to sew the overlapping joins between the tulle and lace - I am already working on this. It means cutting the tulle down so that it fits just underneath the lace at the seam and then when I have done that, pulling the lace over the top and sewing the two down to create as smooth a line as possible on the top vertex.

One thing I have decided and learnt from the whole project - up to this point - is that I also want to try making a wig cap based PURELY on my measurements. That is to say, I will take a pattern of my front hairline, but aside from that I shall use the measurements to chart/mark out the pattern for the foundation on the wig block instead of using a mould. This is something that is instructed in all my wig making books, so at least I will have some plan to follow.

Another thing is that I may just go with the whole U-shaped vertex construction that you see on regular wigs - that is: a very fine (often a drawn through silk/French top) and then the sides and back (from crown to nape) being made with a more robust material (like the honeycomb tulle or stretch lace with wefts). I don't think I will do the drawn through option, but I might try doing honeycomb tulle everywhere except for the U-shaped vertex, which could be made from the fine lace. This might give the wig better stiffness at the sides, especially if combined with a metal spring.

I also - I know I am getting ahead of myself now, have it in my mind to try making a cap that does have a wefted back and sides, but sewn onto stretch lace in the manner of a sheitel (Jewish regular wig). Just to see how that works and turns out.

So many ideas and options... so little time and energy!

Friday, 7 October 2011

A Stressful Week - Decisions

This week has been a bit stressful for me in terms of wig making.

The good news is that I have made progress with sewing the galloon and that is all done now. I am really pleased that I did finish that within the time frame I had given myself. I am making a real effort now to set myself mini targets and to stick to them as I know if I don't do this, I will never get anywhere with the wig making. For anyone else who is reading this and is thinking about having a go or who is already trying to teach themselves wig making, I would suggest that you do the same. Long term and short term targets are really valuable tools in motivating yourself. My short term target right now is to get this foundation (wig cap/base) finished. My mini goal is to finish sewing my first piece of lace down.

After I finished with the galloon, I started laying down my first piece of lace, which covers the: ear to ear, vertex and front hair line area. It took me a long while to do that; much longer than I anticipated. I think this was partly because I have the kind of head shape that requires some darts. I found it more challenging to lay down this lace than the tulle when I made the prototype. The area is slightly different because when I made the prototype I was constructing a circumference band type wig cap, whereas because I wanted to lessen the amount and appearance of galloon going over my vertex area, I decided to make the real wig cap with only one piece of galloon on the vertex, in addition to the perimeter galloon, and this piece goes over the crown area.

The key to laying lace is to get the front hairline as smooth and flat as possible. You don't want any bumps, lumps, ridges or wrinkles. Instead of stretching the lace to make it taut, you need to smooth it with your fingers and then pin in place. I found myself smooth and pinning, then smoothing and re-pinning as pinning in a new area kept creating undesireable wrinkling in other areas. I took the lace off several times and re-started. I think the key at the novice stage is:
  • To have patience
  • To not be afraid to re-start
  • To take frequent breaks
  • To come back again later if you can't do it and try again 
Sometimes it can be really hard to bear those things in mind; especially when you really want to get onto the next stage or just to finish something you had set your mind to doing. However, it is well worth taking the time to ensure that this bit is done correctly as it will make a big difference to the overall look and fit of the wig.

I thought I would have a couple of darts running from the galloon at the crown towards the front, however I ended up with one over each ear. When I made the tulle prototype, I believe I ended up with one over each ear and a couple on the top - so in a way, this may be better. The next step, which I have completed, was to sew the darts down. This helps to keep them smooth and flat.

After sewing the darts, I commenced sewing the lace onto the interior edge of the galloon. I have sewed two thirds of that and am just about to sew the last part (once I have finished writing this). I enjoy the sewing; it is quite therapeutic. I have been timing myself and I noticed I am definitely getting quicker the more I do it. I am hand sewing at the moment, but in the future I hope to try doing most or all of it on the sewing machine.

Once I have completed sewing the lace down, I can cut the excess off and start laying the next part down (the crown to nape).

Now onto the bad news...

I have had to make a decision over how to best ventilate the hair when I get to that stage. Several of my online friends and myself have wondered about the correct and optimum length of the returns (that is the piece of hair that is left and can stick out, sometimes called the mustache, when you make a knot with a hair strand). The wig making books that I have (I have 3), and that other people I know who are interested in wig making have, say one thing. Other people - on You Tube and at a wig making suppliers & a hair suppliers for example - were saying a variety of different things. I found this very confusing and completely overwhelming. Having so many different opinions stating this is how you should do it, makes it very difficult to judge which option or path to choose to go down. I started to feel like a cook who was in the middle of following a recipe and then had people saying: don't do that, it won't work out right, do this... The reality is that the length of the returns is important and a crucial part to get right of the whole wig or hair piece making process. Knowing that caused me to feel an intense amount of stress and pressure. No one wants to think they are going to expend all this effort and energy to get it wrong.

I have come to the conclusion that when you choose to attempt to make wigs, that canvas wig block, foundation and hair become your baby. To complete the task, a certain amount of dedication and enthusiasm is required and because most people who attempt to do it have great passion about what they are doing and want to achieve, it is hard not get really emotional about the whole process. For me, the learning curve continues. My lesson of the week has been to realise that I will make mistakes and to be prepared to pick myself up, dust myself down and try again.