Showing posts with label returns. Show all posts

Thursday, 17 January 2013

Wig Making Questions: Ventilating Loop, and How Much Hair Needed?

I had a question from a reader asking about ventilating and the amount of hair needed for a wig.

Question:

I know that you're supposed to loop the hair between your thumb and index finger before you begin the ventilation process... I was wondering if the loop is supposed to be even meaning if the hair is 24 inches long originally, will it be 12 inches as you ventilate it or does it not matter?

For total beginners - When you ventilate you need to create a curve (loop) in order to catch the hair in the ventilation needle, which means you can then pull it through the lace hole and do your knot. This is achieved by folding over the top of the length of hair where the root end is - remember the hair you buy and use needs to be cuticle correct or it will tangle and matt up when the wig is worn/washed.

To help keep your bulk, raw hair organised, use a pair of drawing cards. Write 'root' at the top, and always place the hair you are using with the root end lying at the end marked root on your drawing cards. You should be able to tell the root end when you buy the hair, as the hair is usually bound more strongly and obviously at the root end. Depending on how the hair was collected, you can also tell by looking at both ends: one end will normally look 'cut'.
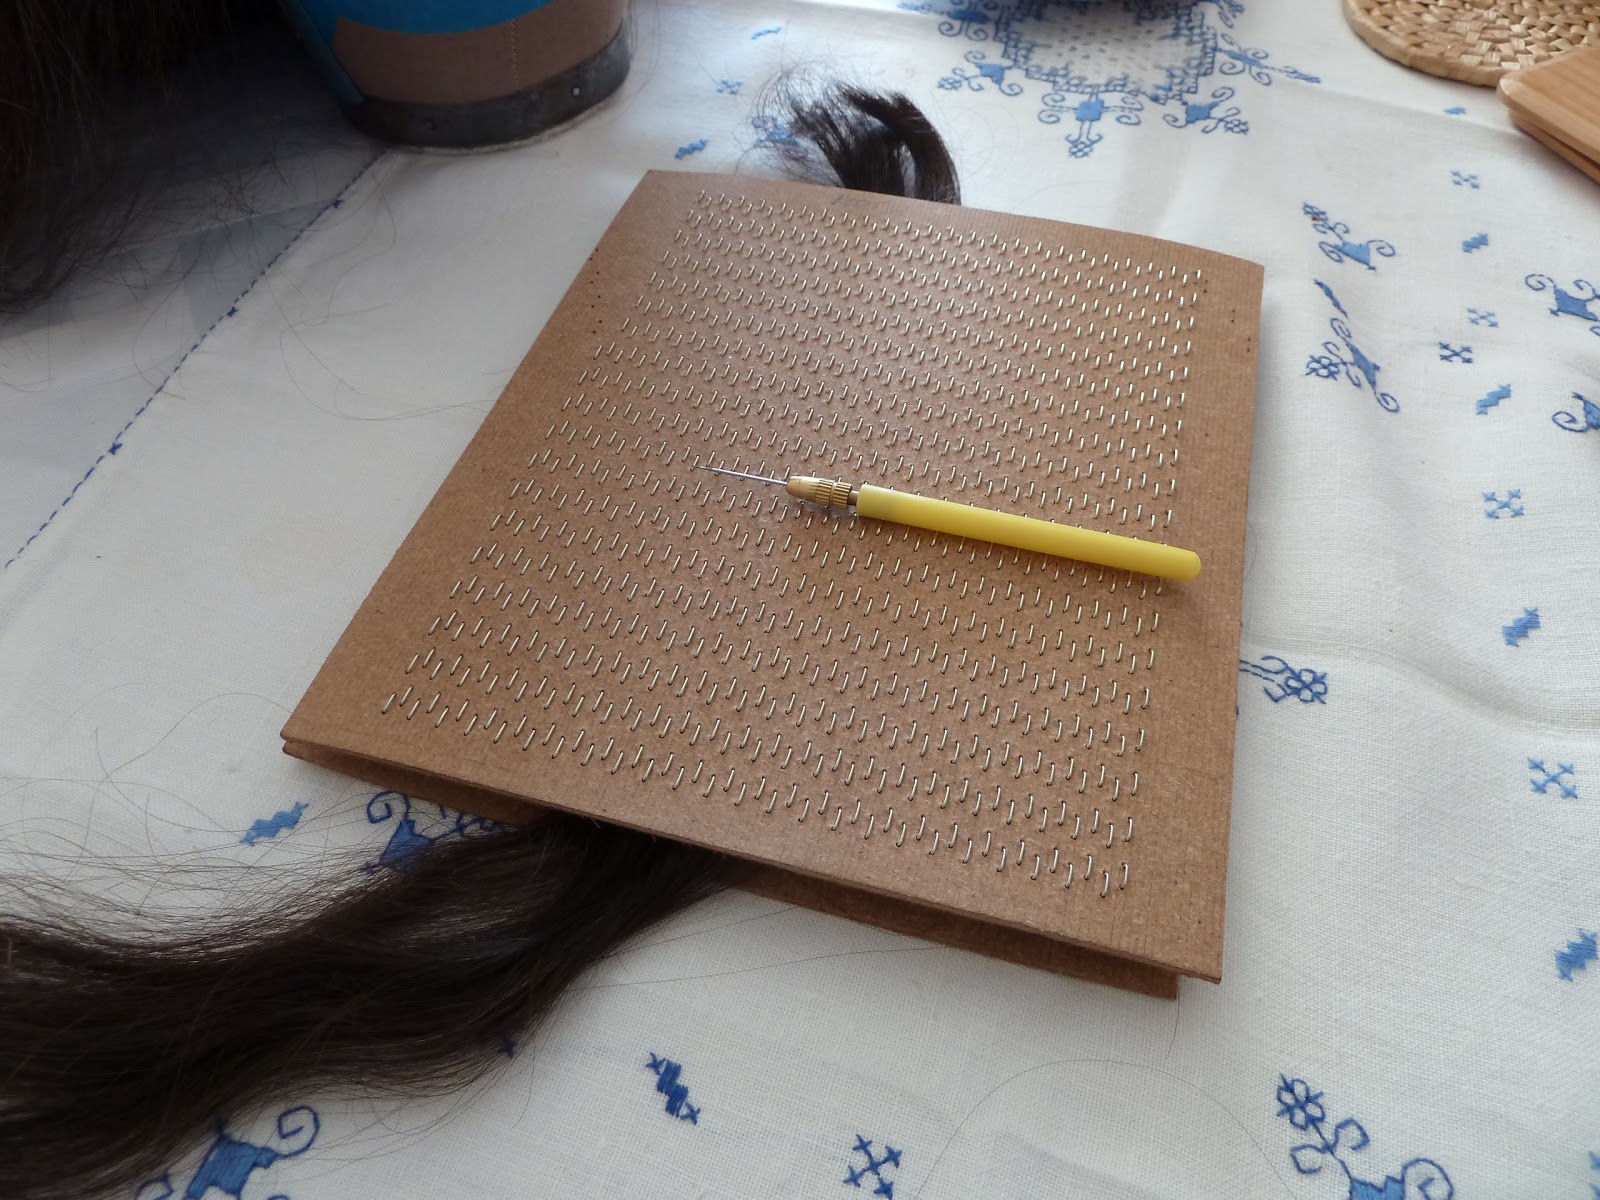
Drawing Cards
Tip: Hold them together with an elastic band or a pair of clamps. If the cards fall on the floor, they may fall apart and all the hair get mixed up in different directions, which would make the hair unusable. 
Root End Marked
 Drawing Cards - The 'Teeth' Hold the Hair in Place and You 'Draw' a Small Amount Out to Ventilate

In answer to the question - Firstly, it should not be even. It depends on the hair used. With processed hair, you can generally get away with longer returns if the cuticle has been completely stripped away (of course it is hard to know whether this has been done or not!). With cuticle intact hair one is aiming for a fold (return) of about 1 inch. Of course this is not a completely exact science, so somewhere around that length should be okay. In my case, I am aiming to do a 1 inch-ish return and this is what I would advise people to do unless the hair is heavily processed and very coarse, thick strands. A good way of judging how it will look is to take a scrap piece of lace, then ventilate about 20 hairs in two 10 strand rows, and just see if the returns are poking up.

 Hair Folded Over to Make a Return

The Loop - this is the holding position for ventilating. Hold the folded loop together between your thumb and index finger. Then draw hairs from the loop through your lace, monofilament or tulle.  
Tip: don't take too much hair at a time from your drawing cards or you might get finger fatigue from trying to grip it all! This also helps to prevent hair wastage when learning, as you may drop some or find it gets caught up and need to chuck it in the bin if the root to tip becomes mixed up.

One problem with returns is the 'salute' you issue - where the returns stand up and poke out of the ventilated hair like a load of regrowth or broken hairs. I have noticed this seems to be more a problem with thick, coarse hair as the returns are not fine and soft enough to fall flat. When using European human hair, this is less of an issue as the hair is finer and softer. It is a complaint that some wig wearers make because it looks odd (unnatural) and irritating, and I have seen people requesting 4 inch returns when they order a full lace wig from China to try to combat this. In theory, as I said before, if the cuticle has been entirely stripped away, this might work okay, but if the cuticle is there, you would risk matting and tangling issues. This is because the cuticle on the hair shaft is like a load of tiles on a roof. When the cuticle is closed and the hair is healthy, the tiles lay fairly flat, but when the cuticle is opened or damaged, some of the tiles stick up. On normal hair growing out of the head, all the strands of hair have the cuticle facing the same way - downwards. When you ventilate hair onto a wig, assuming you have cuticle intact hair that has been kept with the root-to-tip the correct way up, you end up with the long main part of the strand hanging with the cuticle as it would be on your head, downwards; however, on the return, the hair strand is now upside down with the cuticle facing upwards.


If the cuticle opens up (say when you use hot water or a deep heat treatment on the hair) or becomes damaged, then the parts of the cuticle hanging downwards can snag against the return which has the cuticle facing upwards and cause tangling or matting issues. As a result, a shorter return is preferable to a longer return as there is less return length to tangle and snag against the main hair strands on the wig.

Question:

Also, how much hair is needed normally for a lace front wig? (100-120% density)

How much hair you will need depends on how long the hair is, as even for the same density, the longer the hair, the heavier it will be.

Length - remember that you will lose at least 1 inch for the return; however, I bank on losing 2 inches (I am a cautious person). Then, you need to take into account whether you will want to have the wig cut after you made it. If you do, you will lose maybe another inch or two. So if I want to make a wig that is 12 inches long, I would buy a minimum of 14 inches, maximum 16 inches in length.

To get a length of 14 inches, to be cut down to 12 or 13 inches finished length after styling - I personally would be looking to buy between: 170/180 grams (14 inches) to 190/200 grams (16 inches) of raw, bulk hair. This is about 6 to 7 ounces. I like to allow for a little wastage, so would tend to round up rather than down. With a bulk hair vendor, you can usually buy in small increments - certainly in the UK you can buy by the 10 gram increment.

I have tried to think how to make some kind of formula for this. The best I can come up with (I hope this works! BUY AT YOUR OWN RISK - double check with the hair vendor, as they should also be able to advise how much you need) is:

For every increase of 2 inches, add 20 grams, for every decrease of 2 inches, remove 20 grams. This is approximate, it depends on the thickness of the hair (think about it, if the strands are finer, you will get more strands than if they are thicker!). The range gives you a little adjustment because if you end up with raw ponytails, you may find you cannot add them together to weigh exactly 160 or 220 or whatever. I would tend to favour the upper number, better to have too much than too little and, in my case, I have a big head so more foundation to cover (hehe).

10 inch wig: you would need at least 12 inches of hair, you would want to order 150/160 grams.
12 inch wig: you would need at least 14 inches of hair, you would want to order 170/180 grams.
14 inch wig: you would need at least 16 inches of hair, you would want to order 190/200 grams.
16 inch wig: you would need at least 18 inches of hair, you would want to order 210/220 grams.
18 inch wig: you would need at least 20 inches of hair, you would want to order 230/240 grams.

Converter: http://www.metric-conversions.org/weight/grams-to-ounces-table.htm

Generally, if you are buying bulk hair from a supplier like De Meo Brothers (US) or Hugo Royer (UK), it is a good idea to buy a little extra hair for repairs and/or in case you misjudge how much you need. The upside being, the more wigs you make, the more hair you will have in stock (assuming you don't use all the hair each time you make a wig) and you can eventually gather compatible colours together, and blend them to make a hair piece or wig if you want to.

Density - If you want a heavier density wig, then add on another 25-30% so:

Medium density weight x 1.25 (to add 25%)
Medium density weight x 1.30 (to add 30%)

I hope this helps.

Disclaimer: Buy at your own risk. I accept no responsibility for these numbers being inaccurate!

Friday, 7 October 2011

A Stressful Week - Decisions

This week has been a bit stressful for me in terms of wig making.

The good news is that I have made progress with sewing the galloon and that is all done now. I am really pleased that I did finish that within the time frame I had given myself. I am making a real effort now to set myself mini targets and to stick to them as I know if I don't do this, I will never get anywhere with the wig making. For anyone else who is reading this and is thinking about having a go or who is already trying to teach themselves wig making, I would suggest that you do the same. Long term and short term targets are really valuable tools in motivating yourself. My short term target right now is to get this foundation (wig cap/base) finished. My mini goal is to finish sewing my first piece of lace down.

After I finished with the galloon, I started laying down my first piece of lace, which covers the: ear to ear, vertex and front hair line area. It took me a long while to do that; much longer than I anticipated. I think this was partly because I have the kind of head shape that requires some darts. I found it more challenging to lay down this lace than the tulle when I made the prototype. The area is slightly different because when I made the prototype I was constructing a circumference band type wig cap, whereas because I wanted to lessen the amount and appearance of galloon going over my vertex area, I decided to make the real wig cap with only one piece of galloon on the vertex, in addition to the perimeter galloon, and this piece goes over the crown area.

The key to laying lace is to get the front hairline as smooth and flat as possible. You don't want any bumps, lumps, ridges or wrinkles. Instead of stretching the lace to make it taut, you need to smooth it with your fingers and then pin in place. I found myself smooth and pinning, then smoothing and re-pinning as pinning in a new area kept creating undesireable wrinkling in other areas. I took the lace off several times and re-started. I think the key at the novice stage is:
  • To have patience
  • To not be afraid to re-start
  • To take frequent breaks
  • To come back again later if you can't do it and try again 
Sometimes it can be really hard to bear those things in mind; especially when you really want to get onto the next stage or just to finish something you had set your mind to doing. However, it is well worth taking the time to ensure that this bit is done correctly as it will make a big difference to the overall look and fit of the wig.

I thought I would have a couple of darts running from the galloon at the crown towards the front, however I ended up with one over each ear. When I made the tulle prototype, I believe I ended up with one over each ear and a couple on the top - so in a way, this may be better. The next step, which I have completed, was to sew the darts down. This helps to keep them smooth and flat.

After sewing the darts, I commenced sewing the lace onto the interior edge of the galloon. I have sewed two thirds of that and am just about to sew the last part (once I have finished writing this). I enjoy the sewing; it is quite therapeutic. I have been timing myself and I noticed I am definitely getting quicker the more I do it. I am hand sewing at the moment, but in the future I hope to try doing most or all of it on the sewing machine.

Once I have completed sewing the lace down, I can cut the excess off and start laying the next part down (the crown to nape).

Now onto the bad news...

I have had to make a decision over how to best ventilate the hair when I get to that stage. Several of my online friends and myself have wondered about the correct and optimum length of the returns (that is the piece of hair that is left and can stick out, sometimes called the mustache, when you make a knot with a hair strand). The wig making books that I have (I have 3), and that other people I know who are interested in wig making have, say one thing. Other people - on You Tube and at a wig making suppliers & a hair suppliers for example - were saying a variety of different things. I found this very confusing and completely overwhelming. Having so many different opinions stating this is how you should do it, makes it very difficult to judge which option or path to choose to go down. I started to feel like a cook who was in the middle of following a recipe and then had people saying: don't do that, it won't work out right, do this... The reality is that the length of the returns is important and a crucial part to get right of the whole wig or hair piece making process. Knowing that caused me to feel an intense amount of stress and pressure. No one wants to think they are going to expend all this effort and energy to get it wrong.

I have come to the conclusion that when you choose to attempt to make wigs, that canvas wig block, foundation and hair become your baby. To complete the task, a certain amount of dedication and enthusiasm is required and because most people who attempt to do it have great passion about what they are doing and want to achieve, it is hard not get really emotional about the whole process. For me, the learning curve continues. My lesson of the week has been to realise that will make mistakes and to be prepared to pick myself up, dust myself down and try again.