Monday 28 January 2013

Making a Wig Foundation with Lace - Important Considerations ~ Laying Your Lace

I had a query today about how I made the parting on the wig I am making, as it appears so clearly defined and straight. It got me thinking about some of the things I have learnt since starting to experiment with making wigs. One thing I remember researching a lot is: wig foundations (bases/caps). Reason being: a. this was something I am quite obsessive about (due to my hair loss and needing comfort and realism) and b. because if this aspect is not quite right, then the whole thing is pretty much wrong!

When you make a foundation (wig base/cap) with lace, you really need to take your time. There are a few things that it is important to get right at this stage, as they will otherwise affect the wig at a later stage when it is impossible to rectify them.

One of the aspects of making a foundation that needs to be taken into account is how you place your lace. Let's rewind a bit...

When you want to make a foundation, you need to take either a head mould or some measurements of the head that you will be fitting the wig foundation to, and then transfer these onto your canvas or wooden block. Of course, you can take both a head mould and measurements and use them together if you so desire. In my case I am currently using a canvas block, so I put blue tape over it, which allows me not only to have better vision as it makes the lace and hair more contrasting against the block, but also gives me the ability to mark out patterns, measurements and shapes on the block to help me with making the foundation and later ventilating the hair. Once I have marked the block with the head pattern I need to follow, I then take the lace and start to pin it to the block to make the 'form' of the foundation, which can then be sewn where necessary.

At this stage it is vital that one takes into consideration the direction of the lace holes on the different parts of the head/wig. For example, like fabric, regular lace (not the stretch kind) has a bias which means that if you pull it when it is oriented in this position, it will stretch or give somewhat. You do not want to pin the lace when it is on the bias, as it will have stretch to it. If you don't know about the bias of material, then take a fresh piece of square or oblong lace, and hold it on the diagonal (like a diamond shape). Gently tug the corners. You will see it stretches or gives slightly. This is the bias. You would not want to pin the fabric with this being on your vertical or horizontal part of the wig (so not on the front to nape or ear to ear over the top) as otherwise the wig will stretch and move in a most undesirable way.

One of the main areas you want to carefully lay lace is the front hairline to crown. This is the part which everyone looks at the most when they are talking to or interacting with someone wearing a wig. Ideally on the front hairline to the crown AKA the vertex, the lace holes should be marching straight backwards in a nice line and straight across the head in another straight line - you would see the holes lining up in rows going across the head, and rows going backwards towards the crown - not on the diagonal. If you pin your lace on the bias in this area, the holes will be on the diagonal and not straight down and across. This would cause a problem when you came to ventilate the hair onto the foundation as the hair would not fall into part-able rows. It would be criss-crossed.

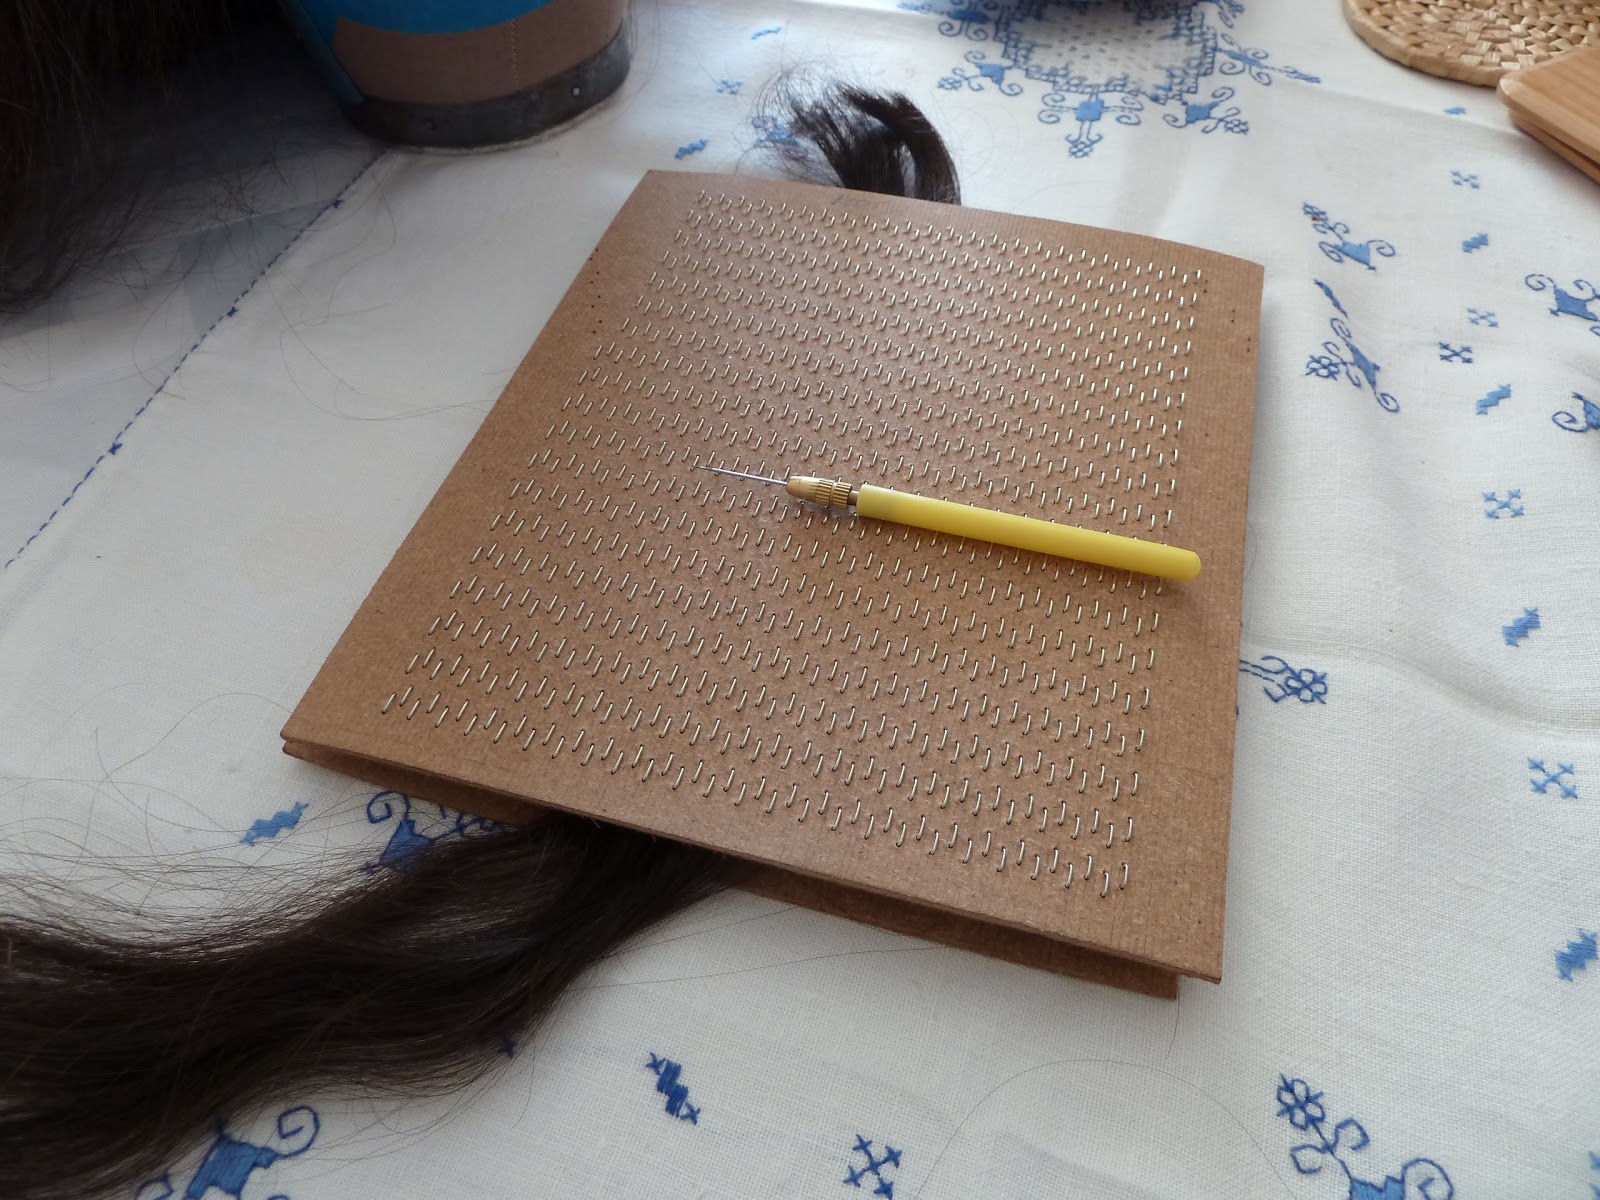
Here is an example of pinning the lace and the lace direction.This image should be clickable to enlarge. See the picture below for a close up of the lace holes. The arrows and lines represent the two directions of the hole: straight from the crown to the front, and across from left to right.
Note how I am smoothing the lace in the vertex section to get it nice and taut.

By following this structure when pinning your lace to the block, you should end up with rows of hair that can then be parted from front hairline to the crown as a normal part line would be. For some people this is too linear and perfect, in which case you can just part a messier parting by carefully using your comb in a more random zig-zag manner when making the part line. My own bio hair always had a very linear part line for some reason, which is why I tend to favour that a little.

 You can see the orientation of the lace holes on this picture more clearly, and how it produces a very crisp part line. In fact, if you ventilate more heavily than I do, the part line will look even more delineated because it will be denser hair around the parting.

There is second consideration when laying the lace onto the block. It is important to lay the lace for the front hairline to the crown as flat and taut as possible. You do not want this material to be rucked up, as if it is the wig will not lay flat or moulded well to the head/scalp shape. This is the case for all wigs, but is especially noticeable in lace front and full lace wigs, because you need the lace to adhere flat to the skin where you are bonding in order for it to look flawless and undetectable. If you have too much material or it was not pulled taut and smooth when making the foundation, you will end up with small gathers in the lace when you bond, which causes a rippling effect against the skin. This can also happen if the wig is too small and is pulling at the skin. For this reason, keep smoothing the lace fabric down gently with the palm of your hand as you pin; you may find you need to unpin, smooth and re-pin as you go. One of the reasons for this is because as you pin in another place on the block, you may find the way you have already pinned it elsewhere is not optimal and needs to be adjusted. A little bit fiddly, but worth the effort in the long-run.

I shall continue this mini series with a further couple of posts about other things that are wise to take into account when making your foundation and laying your lace down.

Thursday 17 January 2013

Wig Making Questions: Ventilating Loop, and How Much Hair Needed?

I had a question from a reader asking about ventilating and the amount of hair needed for a wig.

Question:

I know that you're supposed to loop the hair between your thumb and index finger before you begin the ventilation process... I was wondering if the loop is supposed to be even meaning if the hair is 24 inches long originally, will it be 12 inches as you ventilate it or does it not matter?

For total beginners - When you ventilate you need to create a curve (loop) in order to catch the hair in the ventilation needle, which means you can then pull it through the lace hole and do your knot. This is achieved by folding over the top of the length of hair where the root end is - remember the hair you buy and use needs to be cuticle correct or it will tangle and matt up when the wig is worn/washed.

To help keep your bulk, raw hair organised, use a pair of drawing cards. Write 'root' at the top, and always place the hair you are using with the root end lying at the end marked root on your drawing cards. You should be able to tell the root end when you buy the hair, as the hair is usually bound more strongly and obviously at the root end. Depending on how the hair was collected, you can also tell by looking at both ends: one end will normally look 'cut'.

Drawing Cards
Tip: Hold them together with an elastic band or a pair of clamps. If the cards fall on the floor, they may fall apart and all the hair get mixed up in different directions, which would make the hair unusable. 
Root End Marked
 Drawing Cards - The 'Teeth' Hold the Hair in Place and You 'Draw' a Small Amount Out to Ventilate

In answer to the question - Firstly, it should not be even. It depends on the hair used. With processed hair, you can generally get away with longer returns if the cuticle has been completely stripped away (of course it is hard to know whether this has been done or not!). With cuticle intact hair one is aiming for a fold (return) of about 1 inch. Of course this is not a completely exact science, so somewhere around that length should be okay. In my case, I am aiming to do a 1 inch-ish return and this is what I would advise people to do unless the hair is heavily processed and very coarse, thick strands. A good way of judging how it will look is to take a scrap piece of lace, then ventilate about 20 hairs in two 10 strand rows, and just see if the returns are poking up.

 Hair Folded Over to Make a Return

The Loop - this is the holding position for ventilating. Hold the folded loop together between your thumb and index finger. Then draw hairs from the loop through your lace, monofilament or tulle.  
Tip: don't take too much hair at a time from your drawing cards or you might get finger fatigue from trying to grip it all! This also helps to prevent hair wastage when learning, as you may drop some or find it gets caught up and need to chuck it in the bin if the root to tip becomes mixed up.

One problem with returns is the 'salute' you issue - where the returns stand up and poke out of the ventilated hair like a load of regrowth or broken hairs. I have noticed this seems to be more a problem with thick, coarse hair as the returns are not fine and soft enough to fall flat. When using European human hair, this is less of an issue as the hair is finer and softer. It is a complaint that some wig wearers make because it looks odd (unnatural) and irritating, and I have seen people requesting 4 inch returns when they order a full lace wig from China to try to combat this. In theory, as I said before, if the cuticle has been entirely stripped away, this might work okay, but if the cuticle is there, you would risk matting and tangling issues. This is because the cuticle on the hair shaft is like a load of tiles on a roof. When the cuticle is closed and the hair is healthy, the tiles lay fairly flat, but when the cuticle is opened or damaged, some of the tiles stick up. On normal hair growing out of the head, all the strands of hair have the cuticle facing the same way - downwards. When you ventilate hair onto a wig, assuming you have cuticle intact hair that has been kept with the root-to-tip the correct way up, you end up with the long main part of the strand hanging with the cuticle as it would be on your head, downwards; however, on the return, the hair strand is now upside down with the cuticle facing upwards.


If the cuticle opens up (say when you use hot water or a deep heat treatment on the hair) or becomes damaged, then the parts of the cuticle hanging downwards can snag against the return which has the cuticle facing upwards and cause tangling or matting issues. As a result, a shorter return is preferable to a longer return as there is less return length to tangle and snag against the main hair strands on the wig.

Question:

Also, how much hair is needed normally for a lace front wig? (100-120% density)

How much hair you will need depends on how long the hair is, as even for the same density, the longer the hair, the heavier it will be.

Length - remember that you will lose at least 1 inch for the return; however, I bank on losing 2 inches (I am a cautious person). Then, you need to take into account whether you will want to have the wig cut after you made it. If you do, you will lose maybe another inch or two. So if I want to make a wig that is 12 inches long, I would buy a minimum of 14 inches, maximum 16 inches in length.

To get a length of 14 inches, to be cut down to 12 or 13 inches finished length after styling - I personally would be looking to buy between: 170/180 grams (14 inches) to 190/200 grams (16 inches) of raw, bulk hair. This is about 6 to 7 ounces. I like to allow for a little wastage, so would tend to round up rather than down. With a bulk hair vendor, you can usually buy in small increments - certainly in the UK you can buy by the 10 gram increment.

I have tried to think how to make some kind of formula for this. The best I can come up with (I hope this works! BUY AT YOUR OWN RISK - double check with the hair vendor, as they should also be able to advise how much you need) is:

For every increase of 2 inches, add 20 grams, for every decrease of 2 inches, remove 20 grams. This is approximate, it depends on the thickness of the hair (think about it, if the strands are finer, you will get more strands than if they are thicker!). The range gives you a little adjustment because if you end up with raw ponytails, you may find you cannot add them together to weigh exactly 160 or 220 or whatever. I would tend to favour the upper number, better to have too much than too little and, in my case, I have a big head so more foundation to cover (hehe).

10 inch wig: you would need at least 12 inches of hair, you would want to order 150/160 grams.
12 inch wig: you would need at least 14 inches of hair, you would want to order 170/180 grams.
14 inch wig: you would need at least 16 inches of hair, you would want to order 190/200 grams.
16 inch wig: you would need at least 18 inches of hair, you would want to order 210/220 grams.
18 inch wig: you would need at least 20 inches of hair, you would want to order 230/240 grams.

Converter: http://www.metric-conversions.org/weight/grams-to-ounces-table.htm

Generally, if you are buying bulk hair from a supplier like De Meo Brothers (US) or Hugo Royer (UK), it is a good idea to buy a little extra hair for repairs and/or in case you misjudge how much you need. The upside being, the more wigs you make, the more hair you will have in stock (assuming you don't use all the hair each time you make a wig) and you can eventually gather compatible colours together, and blend them to make a hair piece or wig if you want to.

Density - If you want a heavier density wig, then add on another 25-30% so:

Medium density weight x 1.25 (to add 25%)
Medium density weight x 1.30 (to add 30%)

I hope this helps.

Disclaimer: Buy at your own risk. I accept no responsibility for these numbers being inaccurate!

Wednesday 16 January 2013

Learner's Challenges: Wig Ventilation Density

In my opinion, one of the more challenging aspects of wig making for a learner to get right is: density.

As someone who abhors over dense wigs on myself - I look ridiculous, figuring out density is, and has been, a pretty important part of my wig making journey. Unfortunately, once I started ventilating, it quickly became apparent that density is not something you can learn overnight, so to speak. It is one of those things you learn through practice and possibly some innate sixth sense. I am learning to trust my instinct a little more.

One of the reasons I think density is very difficult to assess and get right as a learner, is that it is something of a stretch to try and realistically imagine what an entire wig will look like (no matter how much you are dreaming of the finished product) when you are ventilating the nape or the back or even the crown. In my case, with the wig, I started off well and then panicked and imagined I was adding too much (I had visions of Attila the Hun), so I backed off and went super light and ended up with... well, not enough in one area.

Of course you may be thinking: 'ah, but you can always go back later and add more hair'. While this is true, I do not think it is strictly the best way to go about things. It is messy and I am a perfectionist. Adding hair on top of already ventilated hair is not really my cup of tea and it is also INCREDIBLY time consuming and slightly insanity inducing. You have to try and keep all the other hair out of the way while you work on an area, and take it from someone who has done repair work, that is no mean feat. I guess some wig makers probably enjoy or relish the task of repairs, I personally do not. I prefer to start with a tabula rasa, a blank slate, and go from there.

So for me, this whole wig density business is something I am trying to get right. As I may have discussed before on this blog, I am a person who needs a lighter density and volume on the top, but I quite like more lushness going on from say the ears, downwards. My own bio hair was like that - flattish to the head and then lots of it around my shoulders and going down my back - and it does tend to suit me a lot more than the puffy wigs.

Where I am running into issues now is getting enough density at the front of the wig so that it hides the foundation, especially the galloon, and yet does not look fake. The front of the wig is probably the most important area to get right - that and the part line/crown (which are exposed). Generally people are looking at you/your hair more closely when they are talking to your face. As a result, I am now ventilating quite densely into the galloon at the 'sideburns' area. I have been striving to cover it up before starting to ventilate into the lace above it. I feel as if I am stumbling blindly around, but I take comfort from the fact that this wig is meant to be a learning curve and a practice session.

 Image is clickable - click to enlarge. On the left is the beginning of the heavier ventilation to hide the galloon from the front view when on the head. On the right is sparser ventilation into the galloon, as no one will see this area because it is covered by hair and unlikely to be exposed. The paper is inserted in the pocket I have made for wig springs, that I don't want to 'sew' together by ventilating hair into both pieces of lace!

 Note how, on the above image, the ventilation looks so sparse. It's amazing how different a wig looks once you start working on the area above where you are ventilating:


This just goes to show how you do not necessarily have to ventilate extremely densely to make a wig work. However, there is a fine line between under-ventilating hair into an area (as I have found out) and over ventilating so that you end up with a wiggy, hot mess (quite literally). Certainly when you are getting near the part line or the front, it is worth bearing in mind what type of base you are trying to cover. If you are ventilating a full lace wig or a lace front, then beautiful, natural, graduated ventilation is the key and it works REALLY well. If you are making a wig like I am, where you have a base that is seamed and has galloon edges, you really need to be conscious of the fact that if you do not ventilate densely enough into this area, you may expose the wig foundation (base).

Monday 14 January 2013

Wig Making Progress Pictures

As promised, here are the pictures I took with my digital camera the other day. It is so hard to get good light for photo taking at the moment, as Britain is enveloped in a continual grey fog. Using the flash when photographing wigs and hair is not the best option really as it creates a false sense of colour and shine. Anyway, I took these photos of the 3/4 finished wig on a brighter day than today - it is snowing at the moment, so no hope of taking any nice sunny pictures today! - and they have come out fairly representative. I have tried to take some pictures of the ventilation/knots close up so that anyone interested in that can see - it's amazing how the lace looks a lot whiter and bigger once you zoom in, than it does in person.


I am really pleased with my progress, although it has taken me ages and I do feel a bit like a snail or tortoise, as one friend has pointed out to me in the past: 'the tortoise wins the race' - http://en.wikipedia.org/wiki/The_Tortoise_and_the_Hare - and I would like to think that she's right.

I am not sure if I am being optimistic, but I am pressing on with this project and hoping that once it is finished I will have broken through my 'first wig' barrier. It does feel a bit like a barrier, because you have to motivate yourself to keep going, and only you can motivate yourself; no one else in my family is particularly interested in wig making and/or whether I actually ever finish this wig. Plus I have noticed that ventilating large chunks of a wig is quite laborious and time consuming. Therefore, I am always keeping the end product in my mind while doing it and I set myself mini-challenges, such as: finish up to 'here' by a certain time. That does seem to help. I feel like my own coach/personal wig trainer.

Hopefully (and here's the optimism again), I will have picked up the impetus and increased my speed by the time I start my next project. More about that when the time comes!

Lastly, I have decided I am unlikely to wear this wig, even if it does fit me well, as the hair is so poor I feel it will just be tangly and horrible after about 1 hour on my head. Maybe I will wear it, just to try the cap style on, but the problem is I can also already see things wrong with it and that bothers me. I plan to review those things (to remind me as much as show anyone reading this) when the wig is finished. As such, I am intending to use this wig as a wig to experiment with cutting and styling. If I do it wrong, I won't be crying about it! I know one thing I really want to do with it - pin curl it and then do a half up, half down style. I may also cut a side bang into it too... hmmm exciting... Okay, so I really must finish it now or I will never get to try all these things out!


Saturday 12 January 2013

Where to buy supplies...

One of the most frequently asked questions I get is where to buy wig making supplies if living in the UK.

There are two main places that spring to mind:

Banbury Postiche - http://www.banburypostiche.co.uk
Hugo Royer - http://www.royer.co.uk/main.php

Both of these companies are located in the UK. As well as selling lace/tulle, galloon, needles, holders and blocks, they supply virgin European human hair. As far as I am aware, both companies can colour/texture match, which is particularly useful for making hair pieces that need to blend properly with the wearer's bio hair.

Banbury Postiche will sell you hair to practice with, but I personally have saved money by using old processed wig hair - Asian/Indian origin. If you have an old human hair wig that you do not want anymore, or some old wefts or just raw hair - you might as well use those rather than buy hair specially to practice making a piece or wig with.

If you are just getting started, you may also want to check out my first blog posts for tips on how to save money when learning and seeing whether you actually like wig making/have an aptitude for it. No point spending lots of money if you eventually find you do not enjoy making wigs or do not have the time.

You can definitely get away with a polystyrene head for purely learning ventilation, a needle holder, some needles and practice hair. You would not be spending more than maybe 20 to 30 pounds.


Friday 4 January 2013

Facing the Last Stretch

Happy New Year!

As promised, pics...


I will get out the digicam tomorrow to take better pics in daylight.

I am facing the last stretch. I can't wait to get this wig done! I want to move on to new projects. I already have several ideas to pursue. The good thing about this wig is the massive learning curve. Being that wig making is so practical, you really can only learn through doing it... Just reading about it by itself is not going to work.

Trying, making mistakes, changing things around, improving aspects of a design, and really learning what you wouldn't do again and what you would do again are extremely valuable lessons I am glad to be learning.