Thursday 22 December 2011

The Next Step - Sorting out the hair...

The next step in the wig making process, for me, is ventilating the hair onto the main body of the wig. In order to do this one needs some 'spare' hair. Beyond deciding such things as - the hair origin (European, Chinese, Indian, Mongolian etc), hair type (virgin, cuticle, processed), hair texture (wavy, straight, curly, body wave etc) and length, you have a few choices. You can either use hair you already have (old wefts, old wigs etc) or buy some new hair (either as wefts or bulk/raw hair in ponytails). As mentioned in my last blog post, I already had some masses of hair on the most ridiculous wig known to man. Due to my novice status, I decided that this was the msot appropriate hair to use. I think that in the earlier stages of wig making it is probably a better idea to use less expensive hair. Then if you go completely wrong, you won't be as devastated as you would if you were using virgin cuticle European hair, for example.


Side note - I do have better hair - raw and wefted, which I hope to use later when I am more proficient. Certainly if I were choosing hair, I would be inclined to go for raw ponytails of caucasian/European origin - because that texture is the same as my bio hair.


As the hair is already attached to a wig, I set about the process of brushing the wig out, separating the hair and removing some. I decided that first separating the hair in half (to effectively create two 'tails') was a good idea as there is about twice the amount of hair I want in my new wig. On the left hand side you can see half the hair has been braided; to keep it neat and out of the way. The right hand side represents half the hair and is what I am going to use on this wig.


You can see just how much hair is in half the wig in this next picture, where I am holding that braid in my hand.


At this point I have the half, to be used, hanging loose ready to be sorted.


As the hair is already ventilated onto this wig, I don't want to just cut it off as a ponytail/braid. If I did this, I would lose a lot of the upper length. In order to keep this length, I need to remove the hair in the stages I am going to use it. As most people start ventilating at the bottom of their wig foundation, I need to take the bottom lengths to use on the bottom of my wig foundation. So, I braided the rest of the hair and only left free the part I want to remove from the bottom right hand nape.


I then clipped this braid up. The hair hanging down is only half of the hair at the bottom of the nape of the wig.


I have drawing cards ready to place the hair into (they are the flat brown and grey squares to the right of the wig two pictures above). This helps to keep the hair neat whilst I am ventilating and enables me to remove small amounts of hair to work with. If you do not have drawing cards and get a pair, remember to write "Root" on one end of them (I wrote it on both sides) so that you know which way up your hair is! You put the loose hair into the drawing cards with the root end of the hair at the end you have designated "Root" and the tip should be hanging out the opposite end. This enables you to keep it cuticle correct. 

I carefully cut sections of the loose hair away. I tried to keep fairly near to the wig cap so that I could keep most of the length. I just used regular scissors for this.


Then I placed the hair in the drawing cards.


After I close them up, I always put an elastic band around them. That way, if I (or anyone else!) ever knock them onto the ground, they won't fall apart and ruin the hair (because if the hair gets mixed up, it won't be cuticle correct anymore).


Now I am ready to start ventilating.

Lastly, I want to wish those celebrating Chanukah:

חנוכה שמח

Here's my donuts, that I made:


For those of you celebrating Christmas in a few day's time...

Happy Christmas! 

I will be back with more pictures soon!


Thursday 8 December 2011

The Finished Wig Cap


Good news!


I have FINISHED the wig cap. Yay!


Here's some pics of it just perched on the wig block:


I am really pleased and proud that I managed to get it done. I think some people doubted I would ever finish it! 

As you can see, I have added an extended nape. The reason I have done this is because a. I wanted to learn to do it and see how it turned out and b. because I have very low babyhair and wanted to see if this would cover it - a bit of a prototype/test. If it's uncomfy to wear, I won't add one to the next wig. 

So the next step is ventilation. I shall be using some dark hair - a #2 (I am guessing) that is wavyish. It is currently ventilated into another wig that I have never worn because it is too small and WAY too dense (it weighs about 325 grams, which is approximately 12.5 ounces!!). The hair is not the best quality, so it is perfect for this project. I won't be crying if it all goes wrong! Hopefully it turns out well...


Wednesday 7 December 2011

Apologies for lack of updates/my silence...

I have been so busy that wig making took a back seat. I recently organised a 2nd Wigs and Head Covers Event in London, which was very successful and have also been getting on with other things at home.

The good news is that I am nearly finished with making the wig foundation!

I am hoping to finish it tonight. After I have finished it, I will take some pictures to post on here and probably shoot some video to upload to You Tube. I am really proud of it. I tried the cap on again before I resumed sewing it down and spent some time pinning it to see if I could get a better fit. The end result of which was that I realised it did fit me okay and that I would only make it fit me worse if I started to fiddle with it and tuck areas. So for this first go at making a proper wig foundation, I think I have done very well - it looks neat. In fact it seems a lot better than I thought it would, so I am very pleased.

The next step is ventilation. I will, of course, be blogging about that too... so stay tuned.

Thursday 20 October 2011

Finally... Pictures!

Since my last blog post, I have finally gotten around to taking some photos of the work in progress. Hopefully they will be helpful in illustrating what I have been, and am still, talking about and doing.

The update on making the wig foundation (wig cap) is as follows:

In the video I uploaded on YouTube, I was still working on getting the perimeter of lace and honeycomb tulle sewn down. I have now sewn the entire inside edge of the perimeter down, except for the extended nape.


This meant that I could, joy of joys(!), take the foundation off the block and... try it on! It also enabled me to remove the mould I had been using.

Trying it on - this was interesting! I was actually rather nervous about it - all this work so far seemed like a big time and energy investment, not to mention the financial aspect of purchasing all the supplies. Then there is that moment where you think: okay this could go either really wrong or really well. Funnily enough, my mind had not allowed for the middle option of: okay-ish. The result thus far (no hair on it, just the lace and tulle) is that it fits me okay. But - and this is a big 'but' for the perfectionist in me - is not quite as snug as I had hoped for at the front. I think for a first attempt it has been a good learning curve thus far and that it is a good outcome.

One thing I do know, is that undoubtedly I will have to use something at the ear tabs/sideburns area as it is too flappy. Those of you who have worn or tried on lace front wigs or glue-less lace wigs, will know exactly what I mean by that. This issue is compounded by the fact that the lace I have used is so fine and soft that it lacks any inherent structure. I shall have to look at how I can add more support and structure to that area. So far I have been thinking to add some wig springs (of the metal variety), but I am also looking into an alternative form of combs to the ones I have tried. I would not mind using combs if I could get them to grip my hair there. That is a big 'if', as up till now I have had no luck in that department due to a combination of a loss of density of my bio hair there and my hair being now very fine and slippery in texture. Ultimately, if I have to, then I will tape it down at that point, but of course I would rather not do this.

My next task is to sew the overlapping joins between the tulle and lace - I am already working on this. It means cutting the tulle down so that it fits just underneath the lace at the seam and then when I have done that, pulling the lace over the top and sewing the two down to create as smooth a line as possible on the top vertex.

One thing I have decided and learnt from the whole project - up to this point - is that I also want to try making a wig cap based PURELY on my measurements. That is to say, I will take a pattern of my front hairline, but aside from that I shall use the measurements to chart/mark out the pattern for the foundation on the wig block instead of using a mould. This is something that is instructed in all my wig making books, so at least I will have some plan to follow.

Another thing is that I may just go with the whole U-shaped vertex construction that you see on regular wigs - that is: a very fine (often a drawn through silk/French top) and then the sides and back (from crown to nape) being made with a more robust material (like the honeycomb tulle or stretch lace with wefts). I don't think I will do the drawn through option, but I might try doing honeycomb tulle everywhere except for the U-shaped vertex, which could be made from the fine lace. This might give the wig better stiffness at the sides, especially if combined with a metal spring.

I also - I know I am getting ahead of myself now, have it in my mind to try making a cap that does have a wefted back and sides, but sewn onto stretch lace in the manner of a sheitel (Jewish regular wig). Just to see how that works and turns out.

So many ideas and options... so little time and energy!

Thursday 13 October 2011

Progress

After my last post, I have made some more progress with the foundation. I have just posted a new video on You Tube talking about my issues - the stress situation - and showing how far I have come with the sewing of the galloon and lace etc.


So to further document the next stage I have completed:

I laid the honeycomb tulle down. Funnily enough, and again surprisingly, it took me ages to do this. I do think that laying lace and tulle is going to be a real area where practice makes perfect. I am sure that with time and repeating the exercise, I shall get quicker. I suppose one also gets to know one's head shape, so once you have darted and tucked it one time, if you are using similar materials the next time, you will probably be making darts and tucks in roughly the same places *assuming the foundation fits well the first time around*. The other thing about this is that, again, I found that after quite a while of struggling I gave up and then came back the next day and "boom" I did it very quickly. Perhaps the brain is assimilating information while I sleep?!

Sewing the darts in the tulle has now been completed. I experimented with polyester cotton in a fairly matching colour for the nape darts (they are quite big/thick due to my head shape). I am not so sure how I feel about the look of this thead though; it looks quite obvious to me compared to the effect achieved with transparent thread. This is not such a bad thing because the nape ones will be covered by hanging down hair. However the two upper darts that are around the crown area, I have sewn down with the transparent thread as I definitely did not want that bulky or possibly visible look up there. The thing is, with the tulle, I was wondering if it is better to sew with polyester cotton as the tulle itself seems to be made from something like cotton. I was thinking: will the transparent thread rub against the tulle and wear it down? I don't know! We shall see; time will tell. If it does, I can probably mend it. I suppose that is the advantage of doing it yourself - you can fix most things reasonably well.

I know I have probably said this before, but I definitely will... take some pictures of the canvas wig block so that I can post a few WIP (work in progress) shots.

Friday 7 October 2011

A Stressful Week - Decisions

This week has been a bit stressful for me in terms of wig making.

The good news is that I have made progress with sewing the galloon and that is all done now. I am really pleased that I did finish that within the time frame I had given myself. I am making a real effort now to set myself mini targets and to stick to them as I know if I don't do this, I will never get anywhere with the wig making. For anyone else who is reading this and is thinking about having a go or who is already trying to teach themselves wig making, I would suggest that you do the same. Long term and short term targets are really valuable tools in motivating yourself. My short term target right now is to get this foundation (wig cap/base) finished. My mini goal is to finish sewing my first piece of lace down.

After I finished with the galloon, I started laying down my first piece of lace, which covers the: ear to ear, vertex and front hair line area. It took me a long while to do that; much longer than I anticipated. I think this was partly because I have the kind of head shape that requires some darts. I found it more challenging to lay down this lace than the tulle when I made the prototype. The area is slightly different because when I made the prototype I was constructing a circumference band type wig cap, whereas because I wanted to lessen the amount and appearance of galloon going over my vertex area, I decided to make the real wig cap with only one piece of galloon on the vertex, in addition to the perimeter galloon, and this piece goes over the crown area.

The key to laying lace is to get the front hairline as smooth and flat as possible. You don't want any bumps, lumps, ridges or wrinkles. Instead of stretching the lace to make it taut, you need to smooth it with your fingers and then pin in place. I found myself smooth and pinning, then smoothing and re-pinning as pinning in a new area kept creating undesireable wrinkling in other areas. I took the lace off several times and re-started. I think the key at the novice stage is:
  • To have patience
  • To not be afraid to re-start
  • To take frequent breaks
  • To come back again later if you can't do it and try again 
Sometimes it can be really hard to bear those things in mind; especially when you really want to get onto the next stage or just to finish something you had set your mind to doing. However, it is well worth taking the time to ensure that this bit is done correctly as it will make a big difference to the overall look and fit of the wig.

I thought I would have a couple of darts running from the galloon at the crown towards the front, however I ended up with one over each ear. When I made the tulle prototype, I believe I ended up with one over each ear and a couple on the top - so in a way, this may be better. The next step, which I have completed, was to sew the darts down. This helps to keep them smooth and flat.

After sewing the darts, I commenced sewing the lace onto the interior edge of the galloon. I have sewed two thirds of that and am just about to sew the last part (once I have finished writing this). I enjoy the sewing; it is quite therapeutic. I have been timing myself and I noticed I am definitely getting quicker the more I do it. I am hand sewing at the moment, but in the future I hope to try doing most or all of it on the sewing machine.

Once I have completed sewing the lace down, I can cut the excess off and start laying the next part down (the crown to nape).

Now onto the bad news...

I have had to make a decision over how to best ventilate the hair when I get to that stage. Several of my online friends and myself have wondered about the correct and optimum length of the returns (that is the piece of hair that is left and can stick out, sometimes called the mustache, when you make a knot with a hair strand). The wig making books that I have (I have 3), and that other people I know who are interested in wig making have, say one thing. Other people - on You Tube and at a wig making suppliers & a hair suppliers for example - were saying a variety of different things. I found this very confusing and completely overwhelming. Having so many different opinions stating this is how you should do it, makes it very difficult to judge which option or path to choose to go down. I started to feel like a cook who was in the middle of following a recipe and then had people saying: don't do that, it won't work out right, do this... The reality is that the length of the returns is important and a crucial part to get right of the whole wig or hair piece making process. Knowing that caused me to feel an intense amount of stress and pressure. No one wants to think they are going to expend all this effort and energy to get it wrong.

I have come to the conclusion that when you choose to attempt to make wigs, that canvas wig block, foundation and hair become your baby. To complete the task, a certain amount of dedication and enthusiasm is required and because most people who attempt to do it have great passion about what they are doing and want to achieve, it is hard not get really emotional about the whole process. For me, the learning curve continues. My lesson of the week has been to realise that will make mistakes and to be prepared to pick myself up, dust myself down and try again.

Saturday 1 October 2011

Wig Springs

One thing I forgot to mention in my last post, but which probably deserves a mini-post of its own is the wig springs!

Earlier in the year, I was talking about them and a person reading this blog asked me to provide further information, which I did. However, as I had not used them, I couldn't really comment on them in-depth, beyond the information I had read/been provided with by suppliers.

Now I have actually used them in a wig, I can give a bit more commentary. Here are the basic facts:

1. The plastic ones I have come in 3 sizes. The size relates to the length.
2. They are made from a very slightly bendy, white-ish plastic.
3. They need to be covered with galloon before you can use them.

Extra information relating to points 1-3:

I tried all 3 sizes at various points/positions on the wig I was converting (from full lace to more of a regular style that does not require bonding). The largest, which are the longest, work very well in the back of the wig. I used two of these - each one stretching on the diagonal from the two 'corners' of the nape towards the occipital bone. Using the other two sizes was less successful. You have to cover the plastic with galloon in the same colour as your cap (or your flesh); a. so they are not noticeable and b. so that you can sew them to the wig cap as the plastic would not hold otherwise (there is no obvious way of sewing simply the plastic on) and it might rub your skin. Because you have to cover them, this increases the bulk and I found that at the front, if I positioned them nearer the front edge/front hairline area, in a way which in theory would be better for a closer fit, they pushed the sides of the wig out and you would be able to see them (or be conscious that they might be seen).

In addition, these plastic springs are not as bendy as I had hoped for. I knew they wouldn't be "bendable in half", but I did think they would be more malleable than they are. The bendability - is that even a word? - of them is minimal. When I compare them to the springs I can feel in mass manufactured wigs I have worn in the past, they are definitely less bendy, and as such, I find that they are not as useful when trying to mould the wig so that it lies closer to the skull.

The reason I was trying to use these plastic wig springs as opposed to the metal ones, is because they are safer from a rusting point of view. However, I am now beginning to think I shall try the metal ones too - I will get hold of some and try them on my next wig - as I have a feeling they might, just might, be a lower profile.  I also think they may be a bit more bendy and flexible, which is what I really need. Of course, to address the possibility of them rusting, I shall have to buy some protective material, which again needs to be tightly bound around the spring.

I will have to report back my findings in the future.

Wednesday 28 September 2011

Back After The Summer Break

Hi everyone!

I wasn't anticipating taking a summer break, but such is life - things got very busy for me and I just didn't have the time to devote to updating my You Tube channel or this blog. The good news is that I am now back and raring to go. I have already made a start by uploading a You Tube video and I am in the process of uploading another. I have been having a few problems with You Tube and Windows Live Movie Maker, so we shall see if it works or not. *Fingers crossed*

Over the summer I finished off a couple of wig making projects:

  • Converting a full lace wig into a regular style wig
  • My first wig repair

Converting the full lace wig into a "regular-style" wig - this was a project I started back in the early summer, in a bid to make some use of a wig that I actually never wear. The wig was wrongly sized for me and just would not work when I tried to bond it. When you add to this the fact I am not crazy on bonding anymore, you end up with a wig that sits in the closet. The sad fact of the matter was that: a. I had spent a lot of money on that wig and b. the hair quality was lovely. So I thought that it was about time I tried to make it functional for me.

To cut a long story short, the way I chose to embrace this task was to edge the entire wig with monofilament galloon. This gave the wig a little more rigidity and structure. As the wig was on the large side in some areas and flapping, I decided to add a piece of elastic to the nape, along with a couple of long wig springs. This means that the nape holds down really well. I also added a zig-zag wire wig comb to the nape (but I need to remove this or alter its position as it rubs my occipital bone). I also added a few snap combs which I experimented with using by clipping them to my stocking wig cap - I am not convinced about this! It does work, but getting them and the stocking wig cap in exactly the right place is tough...

So when I went to get this baby cut, it ended up being stuck down at the front... ugh, yes I know, I know... I said no bonding! But needs must - I had an appointment! I didn't actually bond the entire front, I instead bonded the very top front from not even temple to temple, but corner to corner of my horizontal hairline (going across the top of my face) with one large piece of Supertape on the roll. Then I used some bobby pins and wedged those into the sides and a couple over my ears - instead of gripping my hair (which doesn't work) they gripped my stocking wig cap. The back needed no bonding or bobby pins - now that was a result! I basically have something that is just beyond a lace front!

If I get myself into gear, I shall show some pictures of the inside of the cap. I have pictures of the wig before and some of it after it was cut into a new style.

My first wig repair - A friend of mine, who has alopecia and has to wear wigs full time, asked me to repair a wig for her. It's a really nice wig, has a bit of wear and tear to the cap, but totally serviceable, except for the fact that it was: balding. Now I always think that a wig that is balding is a big insult! As if it's not bad enough to be bald or balding, your wig is balding too!

I should establish a couple of facts here: 1. my friend was aware of my novice wig repairing/making status and 2. I made no promises that I would do a good job.

I set about turning this balding situation around.


There were a few things I found out about repairing - 
  • The wig cap - mesh, lace, net, mono (whatever it is) should be examined prior to mending. I started mending, only to discover there were very tiny (I mean tiny) little disruptions - you can read: holes - to the lace/mononet. This meant that if one tried to ventilate there, they risked making the situation worse. I kept away from those areas and tried to ventilate so the hair would fall over them and thus, conceal them. They were literally 1 edge of a lace/net hole, but often there seemed to be several of them in the same area - as if the lace were failing slightly.
  • Knots - always, always check the knots of the hair already ventilated onto the wig or hair piece before agreeing to repair it. I agreed to do it and started work before I realised that the hair on the rest of the wig was basically going to fall out pretty pronto, due to a total failure of most of the knots! I did speak to my friend about this - turns out there has been virtually no knot sealing and the use of ball-tipped pin-head brushes on the wig. I agreed to continue with the task, but in the future I would not attempt to repair anything with knots like that. It is a case of not being worthwhile for the client/friend or for the ventilator. 
  • It takes a long time - if you are ventilating into completely bald or almost completely bald areas, no problem, as the area is essentially clear and free of hair just like a fresh piece of lace would be. If the person whose wig you are repairing wants you to add hair throughout areas where there is already hair, but it is a bit sparse, then be prepared to spend some time doing it. This is because working in that type of area is hard. You have to continually pin the hair back so that you can see the holes and not get your needle/hook tangled up in the hair that is already there. I did use a water spray as well. 
The outcome of repairing = the wig looks great, but would I do it again? Probably not! It took me far longer than expected. I was pleased with the result, but I also felt that it was one of those cases where sometimes it is perhaps better to start from scratch and make something new. 

Update: my own wig making - So my own wig making has taken a back seat whilst I got on with the repair and family life. I am getting back into it this week and shall be updating again with my progress and hopefully some pictures. The second video has finally uploaded, so here's where I am at now:


Tuesday 5 July 2011

Got My Materials... and Converting Full Lace Wigs

Hi everyone!

Sorry for the delay in writing this. I have been so busy with life and wig making. First off, I have just uploaded a short video to You Tube, in which I show you the materials I received from the wig making company. To summarise:
  • Monofilament Galloon in 1 cm and 0.7 cm widths
  • Light Blonde Galloon in 1 cm and 0.5 cm widths
  • Honeycomb Lace in Light Blonde
  • Fine Lace (like very fine Swiss lace) - comes in flesh tone
  • Stretch Lace (has honeycomb type holes - slightly different to some stretch I have seen) - also comes in flesh tone
  • Transparent Thread
I also ended up separately buying a really large reel of blonde colour polyester thread as the one I have is just a regular cotton reel and I know I will probably run out of it at some inopportune moment. I also picked up a big pack of pins too as I find I am using a lot of these and sometimes they break or bend etc.

Here's the video:

I mention in the video that I have been converting a full lace wig into a non-bonded one. The reason for this is two-fold. Firstly, due to medical problems, the wig no longer fits me correctly for bonding. It means that bonding it is very difficult (more-so than normal) as the wig does not want to lay correctly to be adhered down and secondly, because of those medical problems I find bonding to be difficult because I do not really have the energy to keep my arms in the air for long periods of time on a regular basis. So, there I was with a 16 inch remy wig just lying in my closet waiting for something to happen. I actually really need a wig right now that works for me, as the hair I do have is very short and while I don't mind that, there are times when a girl just wants to have long hair. 


So far I have probably spent about half a day working on the wig. I am half-way though. I would say that the effect with this wig is almost like a glueless lace wig, except that the front is no longer lace straight to skin, instead it is monofilament galloon. I shall be ventilating a little more hair into the top middle, as I am parting the hair in the middle - a rarity for me! Parting the hair in the middle helps to make the density less noticeably "pouffy" on top (something that I am trying to get away from as I find it is unflattering on me). I shall also under-ventilate hair into the inside of the galloon as this will help to cover any edge. Once this is finished, I shall be getting it cut into a style and will put up a pic at some point of the finished product.

Anyway, before I started converting the full lace wig, I had finished the prototype cap and tried it on. It fitted me extremely well except for the nape. I think the nape didn't work so well because on my original head mould, I had not managed to cover the bottom inch or two of the back of my head to my nape, so when I put the pattern on the block, I ended up guessing how far my nape extended and so on. Taking this into account, I made a new mould of my head, put it on my block and stuffed it so that I could start making a proper wig cap to make my first wig with. I was mapping out the galloon structure (by default this step essentially creates a pattern for you to follow) and had started sewing the joins, corner darts and the gathers over the ears. Once I have finished the lace wig - by the end of this week - I shall be going back to doing that. I hope to take some pictures so to illustrate what I am talking about. 


Friday 17 June 2011

Another Double Post! Wig Making Supplies - Foundation Bases and Galloon

Yes, I finally ordered my base materials and galloon. It took me long enough!

When I think back to starting this journey in September 2010, it seems to have been a lengthy process to even get to this point. One of the big factors for me has been finances. Proper wig making is not cheap! Initially one of my reasons for wanting to make my own hair pieces and wigs was because I felt that I could get a good quality and better fitting product by making it myself for a lot less cost than if I bought one from a sheitel macher (Jewish wig maker) or other custom wig maker. The reality is somewhat different.

Of course the actual monetary cost of the equipment and consumable products such as the hair, the foundation materials and the galloon is less than you would pay for a fully customised, fully hand tied, good quality human hair wig. However, there is a value to one's time and by not taking into account the man-power hours it will have taken me to make the finished product, I am not accounting for some of the wig's value. Part of the cost of this type of wig is the hours spent making the cap, fitting it properly and then ventilating the hair. Certainly at my novice level the number of hours taken to make a wig will be significantly more than a seasoned professional. For me, this is not such an issue, as I have finished my studies and some of my freelance work has tailed off for the summer, however, for other people I can see that the spare time needed would be really hard to come by if working and perhaps raising a family. For a lot of people, I guess it really would be easier and more cost-effective to purchase a wig.

Coming back to the cost - so, yes, the cost was a big factor and is one of the reasons it has taken me some time to get to this point in the learning process. I took from September 2010 through till May 2011 to save up the 'spare' money to be able to invest in these products. I am glad I waited and did not put the purchases on a credit card, as by waiting I have actually learnt a lot more as I have spent the time doing research, watching other people's videos on YouTube and also getting hold of books.

Ordering the foundation materials felt very good; as if I have finally reached a significant point and am not just dreaming of an abstract concept. I must say, I really advocate bothering to order, and possibly having to pay for, samples of the nets and meshes if you are planning on making anything other than a full lace wig. The reason I say this is because wig making suppliers tend to assume a level of knowledge that in a novice is just not there. Their descriptions of products are generally very vague; as are the colours they refer to with the laces and other foundation materials. If I had ordered these products based on their descriptions alone, I would definitely have ended up with either the wrong products or, perhaps a better way of putting it, laces and other base materials that were not optimal/the best for my personal needs and situation. By ordering the samples, even though it cost me a lot of money to do so, I ended up being able to really look at, feel, and place against my skin the different options available. Some of them I immediately could see were unsuitable for my needs at this time and others were not a good colour match or were completely different to how I had imagined.

Now I just have to wait for the order to be delivered. I think it will probably come sometime in the early part of next week. I shall share what I receive on this blog. In the meantime, I continue to work on my prototype wig foundation cap - I will be taking more pictures as I go along and will post another update on here soon.

My Latest YouTube Video - Showing the progress with the prototype

Monday 13 June 2011

Prototype Time - Experimenting With Making A Regular Wig Cap

As I said in my last blog post, I started trying to make a regular-style wig foundation. I am in the process of attempting this at the moment. I have taken some pictures to share in case anyone wants to understand the process. N.B. This is just for practice and a bit like a prototype. I don't want to waste expensive wig foundation materials at this stage in case it goes wrong.

I have outlined my hairline on the wig block using ribbon and then sectioned off a couple more areas, as I will be making each area out of a piece of tulle (when making a real wig cap this would be foundation material such as lace).


Once I did this, I then started by attaching a piece of tulle (when making a real wig cap this would be foundation material such as lace). To do this, I used pins and I made four darts (tucks) where there was excess material. Depending on the base material used, you will probably end up doing this at some point because the material is flat and the head is curved.


Having pinned the material to the head successfully, I then took invisible thread (something like clear monofilament thread) and sewed each dart down its long edge so that it was flat and neat.


I then took blonde coloured polyester thread and sewed around the inner edge of the ribbon to secure the tulle to the ribbon.


I then repeated the process by attaching a fresh piece of tulle to the vertex, although this time I did not need to put in any darts. I then hand sewed around the inner edge to attach the tulle to the ribbon.

The next step is to cut the excess tulle where the two pieces meet and to create a seam between the two and sew them together onto the ribbon to create a neat join.  


Thursday 9 June 2011

Double Post Today - Finished The Top and Ordered Samples

This is my second post today as I answered a query about wig springs in my first, which you can find here:

http://makingwigs.blogspot.com/2011/06/wig-springs.html

I finally finished my practice top piece, which would constitute the area of a topper or a large closure or the top of a wig. I am quite pleased with it as I feel that I achieved the flow of the corners  and the crown hair falling down the back, which is why I wanted to make this - to learn how to do that. Here is the finished item:


I have now finished with the styrofoam head and moved onto using the canvas wig block. The other day I covered most of it in blue tape. If you want to know about this tape, you can read about it here: http://makingwigs.blogspot.com/2011/05/beginning-what-you-need-to-get-started.html


Bizarrely, I found covering the canvas wig head with the tape to be quite difficult as the head is rounded and the tape is straight and it's hard to cover it without making 'bubbles' and 'pleats' in it. In the end, I made a few slits in the tape where it wanted to make a pleat and this seemed to help to avoid lots of bumping.

The finished product - this photo shows the front; the back has the blue tape extending down the entire length of it.


My next project is to make more of a regular-style wig cap (foundation). To do this you need galloon, which I don't have yet. So I am utilising some ribbon that I have in my sewing supplies and which I will not be using for anything else. I prefer to use things up that I already have as I am only learning and I would rather not waste good money on things I end up chucking away. At some point, I will post a new entry about the process of making a regular-style wig cap. I am trying to take photos as I go along so that it is helpful to others who may wish to have a go at making something similar.

In the meantime, I managed to order my set of samples from another wig making supplies company; these samples are all types of foundation materials and ribbons. Ordering them has cost me quite a bit of money, as I have to pay to get them from abroad, but it is a necessary step and expense. If I was going to make a lace wig - full or lace front, I would only need lace. However, because I want to make a regular-style wig that is fully hand tied, I need to see what other materials are available so that I can design a custom wig cap that will suit me and my needs.

Wig Springs

So I have been asked a question: 

What exactly are wig springs and how are they used?


  • Wig springs are used in traditional or regular wigs. They are added at specific points on the wig foundation in order to help it to cling securely to the head. An example that many of us wig wearers will be familiar with are the bendable ear tabs at the sideburn area of many wigs. If you bend these ear tabs, they flex slightly and will stay in the position that you bend them. It is possible to achieve a better and closer fit to the side of the head by altering these slightly. Traditionally in regular wigs and wigs used on stage, these "springs" have been used at other points on the foundation, such as near the nape or the on the sides of the head near the ear, as while a custom wig should fit well, this helps give an even better and more secure fit and lessens the amount of clips/combs and adhesives that need to be used.


  • What are they made from? - Originally they were metal and looked like an actual spring, however now you can buy plastic ones. The advantage of the plastic ones is that they do not rust. A metal spring can be used, but it must be encased in a waterproof material before you can sew it onto the wig foundation or else it will rust when you wash the wig. The more modern versions are similar in material to the plastic boning that can be found in corsetry. 

A metal spring:

A plastic wig spring:


You can buy these springs from a wig supplies company and they come in various sizes. They are inexpensive. Tip - If you want to see what one looks like and have an old wig with bendable ear tabs, cut the seams on the ear tab of the wig and take it apart; you should find a small piece of plastic or wire inside some ribbon type stuff (galloon).

I am planning on using some of these springs in order to give the wig more structure and security as I do not want to bond it. 

Tuesday 7 June 2011

Learning To Make The Top - Vertex and Crown

After I spent some time just practicing ventilation - single and double knots - on small pieces of tulle, I decided that a good mini-project to get me started would be to learn how to make the top of a wig. This would also constitute valuable practice at making a topper or closure as essentially such hair pieces cover some of, or the whole of, that area.

Ventilating technical issues with making the crown and the vertex, in my opinion, centre around the following:

  1. Realistic flow and placement of hair at the crown and "corners" of the rear vertex, in order to simulate bio hair growth
  2. The part line being realistic
  3. Establishing the correct density for the individual - not wanting it too "pouffy" or "wiggy"
  4. Graduated density at the front hair line
  5. A hair line that is not too 'perfect' or moon-shaped looking
  6. Neat, small knots
So far I have managed to conquer number 1 and number 3. I am getting there on number 4, 5 and 6. Number 2 is harder at this stage. I am still working out how to make the part line how I want it. I would ideally like to do a drawn through part line. I don't mind having a fixed part line at this stage, as I think doing an entire drawn-through vertex would be too ambitious and a lot of work. 

So here's some pictures of the WIP (work-in-progress) -


I have actually nearly finished it, so I will post pictures of the final piece shortly. 

This work was done on the styrofoam head as I had yet to purchase the canvas wig block. The hair piece is made using tulle with blue paper underneath to highlight the tulle/hair and to reduce eye strain. It has double knots in the lower back portion & single knots on the rest. I used a mixture of a #1 and #2 needle - the #1 is perfect for doing single hair knots and the #2 is good for picking up 2 hairs for the lower back where you might want more density. 

The hair used was cut from the wefts of an old processed human hair wig. The downside of using this type of hair for practice and/or for making an actual wearable hair piece or wig is that it can be variable in thickness, strand colour and durability. Some of the strands in the hair I have been using are very thick and dark, others are incredibly fine and almost translucent, while the rest are more what I would call normal. When ventilating using the very thick or fine strands, there can be quite a bit of breakage, so I have tended to bin those hairs. I would certainly not use hair like this to make anything other than a practice piece or practice wig. The hair quality is extremely poor and it is not worth the effort to hand tie all this hair for actual wearing! However, I would definitely recommend using hair like this to practice with at first. Later you might want to switch to a hair type that mimics or is the same as what you will be using to make your first wearable wig or hair piece. For example, I want to ultimately use caucasian or European hair, so at some point I will switch to that in order to get a feel for it. It is much finer than the hair I am currently using and I will, most probably, need to use a very small/fine needle. I will also experiment with Indian remy hair as this is another hair type that I would like to use. 

Friday 3 June 2011

Wig Making Equipment

So I finally ordered and got my new wig making equipment. This is the next step after using the basic materials listed in my last post. I was lucky because I already had some of those, so it was inexpensive and easy for me to get started on practicing ventilation. The best thing about doing it this way, is that you give yourself an opportunity to try ventilating before you commit a lot of money to buying loads of equipment. If you buy all the professional wig making equipment first, you could easily spend between approximately £100-200 or $150-325. The risk with this is that some people will undoubtedly find that they do not like or enjoy ventilating and wig making, and other people will find that they do not get along well with it; it won't come naturally to them.

I made a video about my equipment:


The equipment you can see in the video is pretty much the basics that everyone needs. There are other things you would need to add to this if you do not already have them, such as: foundation material (lace, net, mono etc), hair, ventilating needle holder, scissors, pins/needles/thread and possibly many more! One item I bought that is optional was the plastic wig springs (the long, thin, flat white sticks). If you want to make a bonded lace wig, you won't need those. Another optional item I have not yet bought and will be buying is galloon - this is used to edge a regular wig with and can be bought from a wig making supplies company. 

In my next post, I will show you the first steps in using the canvas wig block. 

Tuesday 24 May 2011

The Beginning – What You Need To Get Started

I first started practising by just doing random knots on a small piece of tulle. The basic materials you need to get started at this stage are:

A styrofoam head - You can get one of these for around $4 in the US or upwards of £7 in the UK. Good places to get them: on ebay, Amazon or from beauty supplies stores and wig shops.

A ventilating needle – There are two types of needle: German and Korean. I have the German needle in sizes 2 and 1. I actually recently broke the #2 needle by dropping it on the floor (which crushed the hook part, rendering it unusable). However, the reason I started with the German style needle is because it was recommended to me. I am hoping to buy some Korean needles to try sometime. I think that which type you choose comes down to personal preference. The difference seems to be mainly in the shape of the “hook” part – on the German needle it is like a number 7; on a Korean needle it is like a J. The number relates to the amount of hair that the hook picks up.

A ventilating needle holder - You can get these with handles made from brass, wood or plastic. The cheapest is plastic. I like my plastic one, although I wouldn't mind trying the wooden one. I am not a fan of brass as I do not like the smell of the metal on my hands. I also think that a brass one would be rather heavy compared to the plastic or wood. 

Blue paper or Scotch-Blue Painters Tape – Either will do, but the paper is cheaper in the UK. For some reason the tape is expensive over here. You need one of these options to put on top of your styrofoam head so that you can see your lace, tulle, mesh or mono without straining your eyes. I prefer lighter coloured blue as it creates more of a contrast.

Light – A good lamp for working in low-light conditions is a necessity. In the daytime in the spring and summer, if you have a bright, sunny room then you can work without supplemental light. However, if you want to work in the evening or during the autumn and winter then you will need a bright light. There are so many different kinds and I shall be doing another separate blog post about them later, however, the cheapest option you can usually find is a desk type lamp which allows you to angle to 'neck' of it to illuminate the part you are working on.

Hair – You can use 'old' hair or buy some cheap wefted human hair from an online store or beauty supplier. I use 'old' hair that I cut from the wefts of a processed human hair wig that I no longer want. If you can do this, it is a good way to save some money. There is definitely no need to buy bulk or expensive hair at this stage as you are just practising and won't be wearing what you are making.

Scissors & Pins – Most people have these items already, but if you don't then you will need a small pair of embroidery scissors and some pins such as ball head pins or t-pins. If you have a pair of nail scissors, you can use them instead of buying embroidery ones. You will also need a larger pair, such as fabric scissors, for cutting your tulle or net. However, again if you have regular scissors that you use to cut things like wrapping paper, they will suffice at this stage.

Tulle or Net – I bought some white tulle from a local sewing shop; it does not cost much at all. I was also given some by a friend in a different colour. The tulle/net comes in different patterns. I have both diamond and honeycomb shaped tulle; either will do, but honeycomb shapes are more consistent with the Swiss, French and German lace that you will be using later if you decide to make a proper wig or hair piece. Please note, you can only use this type of net for practising on as it is quite fragile and will easily rip and tear if you are rough with it. For example, I have stuck T-pins into it and they have become stuck and ripped. If you are just starting out and already have some small offcuts from full lace wigs or lace front wigs, you can also use those to practice a few knots on.

If you search for wig making supplies on Google, you will find the wig making supplies companies for your area. In the UK there is one main one and there are a couple in Europe. In the US there are couple that have a big online presence, as well as lots of theatre and stage make-up supplies companies that sell small selections of wig making products.

Optional – You can buy a plastic clamp to secure the wig head to a table or other surface. I have one, but I don't use it for wig making; I prefer to use the styrofoam head on my lap, as I usually sit on a comfy seat.

It is a good idea to get your eyes tested before you engage in this type of close up work. Some people find that using a magnifier or magnifying lamp is helpful as it not only helps you to see better, but also can ease/prevent eye strain.

There is more equipment that you will need to buy later if you wish to make an actual wig. I will list other items in another post.


Monday 23 May 2011

Introducing: "Teach Myself Wig Making" & "The Wig Making Diva"

So I guess a first post should typically introduce the writer/blogger and set the tone for the blog...

Right? Okay, I'll give it a go! Perhaps rather disturbingly, I shall now interview myself with the questions I think someone might want to know the answer to...

What's this blog about then?

This blog is going to be about wig and hair piece making.

Why?

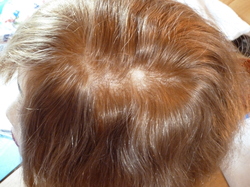
I began a journey a while back – can't even remember when, but some time last year – to teach myself how to make wigs and hair pieces. Primarily I am attempting to learn to do this because I have alopecia, which means that (in my personal case) I have lost some of the hair on my head. As a woman with long-term alopecia, having 'something' that replicates hair is pretty important, even if, as in my case, you don't choose to wear it all the time.

So why don't you just buy a wig or hair piece?

Well, in the past I have done so, many times. However, to be honest, there are a number of factors involved in such a purchase that have to be right in order for the wig or hair piece to be satisfactory for the wearer. In my case, I need something that is the right density and, for some reason, this is hard to get right. Also, I would prefer human hair, but in the colour I want this tends to be quite (read: very!) expensive unless it is heavily processed and the type of wig or hair piece I would want in human hair, is out of my budget. I also have a head that is difficult to fit because it is in-between sizes, meaning that generally stock wigs are too small for me, which necessitates buying a custom made piece. Lastly, for comfort reasons I love the feel of a hand-tied wig and they are not easy to find in a size that fits me unless I purchase custom, which again is too expensive. The only way I could get what I want is to buy a lace wig, however, the hair quality on lace wigs is generally poorer than I would like and I don't want a lace wig as I don't want to bond the perimeter in any way. I actually have a full lace wig, but for varying reasons I don't wear it on a frequent basis. 

Due to all the above factors, I decided that if I can't get what I want, then why not try making it? I love working with my hands, am quite creative and inventive (even if I do say so myself), so I feel and felt that it is worth a shot. I also feel that, if anyone knows what I need in terms of density and colour, it's me. So again, I feel that I have my own best interests at heart and I will put a lot of love into making something for myself.

Anything special or different about your approach to learning wig making?

Well I am trying to do my “learning” on a budget. I have been lucky in that some people have given me bits and bobs that they don't want or need that I could use. I have bought the bare necessities to learn ventilating with (which is the term for knotting the hair to the foundation material) as I figured that this is probably the most important part to 'get down' before I start doing anything else. The ventilation makes or breaks the wig and I reckon is of equal importance to the foundation (the wig cap that the hair is attached to). So if you want to do wig making on a budget, perhaps you can pick up some tips from me!

All of my learning thus far is self-taught, again for budget reasons and also for practical purposes because there are no wig making classes or courses nearby. Plus it seems that wig making courses are very expensive over here in the UK. I am not discounting the idea of attending more formal learning at some point, as there are some elements I would love to get professional guidance in, but for now I am happy to continue with what I have been doing.

What is your 'plan of action' for the future?

I started off practising the knots I will be using – single and double knots. I have since learnt how to do a split knot also; although opinion is divided over whether this is a “real” wig making knot. So to begin with, I was just doing rows of random knots. My next stage/latest project has been to construct the first inch of the back, the crown and the vertex -  a bit like a “mini hair piece”. To most people this would look a bit like a small topper or closure. My reason for doing this is because, rightly or wrongly, I believe that these areas are the hardest to get right and to perfect. They require practice and in doing lots of this, I am actually learning how to achieve the various special effects needed to create a piece or a wig the way I would want it.

I intend to finish this piece of work shortly and I will be posting information and pictures to show what I am doing. Once I have finished this, I hope to have obtained or be in the process of obtaining my professional materials in order to move onto the next stage of my education, which is: how to make a foundation. Making the correct foundation is important because I have specific needs that I have to address when I make it. I am sure it will be a bit of trial and error. Once I have nailed that, I can move on to actually making the wig.

What's been the hardest aspect of your wig making education process so far?

Two things: the research element and double knots!

Research element – I have spent literally 100s if not 1000s of hours researching wigs and wig making. It's almost embarrassing to admit how many hours I have spent looking for information, watching videos, reading books and so on. I guess having a slightly obsessive personality helps! It's a lot of work and commitment required and more so because I am doing this alone. The upside of this is that it is very satisfying to find the correct information and everything you end up doing really has meaning or a little story behind it.

Double knots – I am sure that most people don't find them hard, but because I was unwittingly using the wrong (in my opinion) needle, I made the task a lot harder on myself than it should actually be. I am not a fan of double knots even now I know how to do them as I find they are quite bulky. 

Anything else you care to say right now?

If you are interested in learning more about me and like You Tube, you can find videos on my channel: