Showing posts with label hairpiece. Show all posts

Monday, 2 September 2013

Back to the Wig Block - Working on a Small Hairpiece

It's September and I am finally back to normal - so my blogging and answering emails should become more frequent. Apologies to anyone who has been waiting for a reply! I shall be catching up with replies this week. I was away for much of August, so had put down the ventilating hook and the computer/blogging/emailing and taken a break. I think sometimes this is just what we need when we work so hard at a craft that is quite physically and mentally demanding.

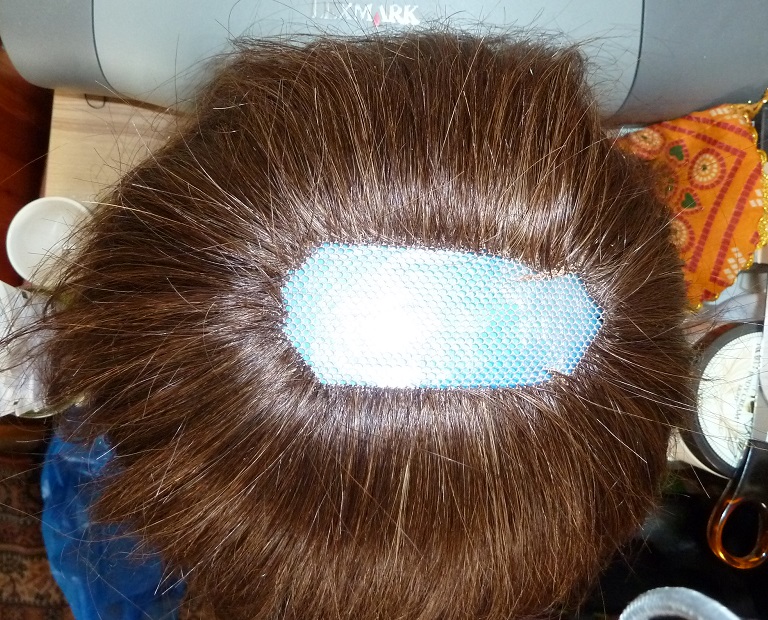
Anyway, back to the wig block! I am in the midst of working on another hairpiece. This particular one is the smallest I have made so far and I shall be interested to see how it works on the wearer's head. I am hoping it will function as intended. It is a clip-on hairpiece that has a seamed/galloon edge. My concern is that with length being far greater than width, it may not sit as flat as I would like.

Tiny Hairpiece Base - Parting Piece
One issue with making a hairpiece is that it is very hard to tell exactly how it will behave until you have finished it as the weight of the ventilated hair adds an element of structure/stiffness to the 'floppy' base and that, in turn, helps to keep the hairpiece flush to the wearer's head (I guess the force of the weight of the hair is being exerted downwards onto the scalp). As a result, I shall have to see what the end result is and will report back with some pictures.

I have some wig pictures to post of a lace front wig that I made - will post them at some point in the next few weeks.

Thursday, 1 August 2013

Making Hairpieces - Special Challenges

One of the things I have discovered over the years that I have been working at wig making is: there's always something new to learn! Perhaps surprisingly, given their size, hairpieces are a nice little challenge and there is a lot more to designing and making them than meets the eye. Due to the way in which a hairpiece is worn, I find there is a certain complexity to the design and planning stage and this goes beyond what I would normally need to think about when designing and planning a wig.

How much hair?

With a wig, I can generally guesstimate how much hair I will need; however, with a hairpiece this is more complicated as one has to think:

How big is the hairpiece?
How dense does the hairpiece need to be?
Will the hairpiece be totally hand tied?
Is the hairpiece going to be really short or really long or somewhere in the middle?

Length and density can dramatically affect the amount of hair needed, and hand tying has implications over a hairpiece that incorporates a mixture or weft and ventilation.

Big versus Small Base?

Another aspect to think about when they are planning a hairpiece is:

How big does the base really need to be?

When I was working with people who had hair loss, I noticed that there was a tendency for people to want to get the biggest hairpiece possible, but this does not always work out for the best:
  • The wearer was over-compensating for their loss and needed less hair. Too much hair looks fake.
  • As with wigs, a lot of hairpieces are made with excess hair which means they are far denser than a normal/average head of hair would be. In reality this means that the bigger the base, the more excess hair there is - this is hair which we would not normally have on our heads and suddenly there it is... and you know what? It looks fake too. This is, unfortunately, especially true when you put such a hairpiece on the head of someone suffering from partial hair loss/alopecia. The thick density of the hairpiece does not blend well with the natural density of their own hair: the two do not merge. Sometimes people with hair loss have to adapt to the fact that the hair they have left has changed, and rather than trying to achieve what they used to have, it is better and more realistic to work with what they have - thus someone who used to have thick hair may find that when replacing what is lost, to effectively blend it with what they have means they end up with a medium density. For those wearers who do not like this idea, a wig can sometimes be better as there are less or no issues of blending with their own hair.
A solution may be one of the following:
  1. A smaller base - If the person wants to compensate for one or two layers of hair, a small hairpiece can work wonders. Sometimes less is more! In this situation, hairpiece base length tends to be more important than width. The hairpiece needs to cover the front to crown to provide a sheet/wall of hair falling down over the person's own hair, whereas width just adds more hair so 2 inches for minimal loss or someone wishing to cover their roots would work well.
  2. Rethinking the large base - Sometimes it is better to stick with a large base rather than ventilating the same amount of hair as you intended to 'replace' into a smaller base, as this can result in a dense/thick hairpiece and a poor blend between the wearer's hair and the hairpiece. Instead you would ventilate less hair into a larger area of base material; this results in the hair being spread over a greater area, thus looking more natural rather than having a lot of hair ventilated into a small area and looking like a great clump/chunk of hair plopped on top of someone's head. If you do decide to ventilate less hair into a larger base, it is worth thinking about the part line (if there is one) and ensuring that it will be dense enough. 

Wednesday, 10 July 2013

Men's Toupee Hair System - making, cutting & styling

Recently I had to make a hair system (toupee) that was to be in a 1960s pompadour style. Effectively it should look like the top of this but without the gel:

From: http://www.elvis.com/news/detail.aspx?id=6399

The Base - I used durable wig net and a lace perimeter that enables bonding and a natural hairline. This is the first time I have used wig net is for this type of work. The pros are that it is cheap, it is a reasonable colour if working with brown hair and it is very durable. The cons are that the holes are very large and because the hair on the top of the head is more likely to separate than hair hanging down, you can rely less on heavily dense large knots to hide the holes than if this material was being used at the back or sides of a wig. As a result I had to do so many more knots, which was time consuming.


The Hair - I used Indian hair in a number 4 with some blonde to to create a variation of colour/highlight. This type of hair is softer and more malleable than say Chinese, and the natural movement/kink/wave of the hair helps when creating the hairstyle. The hair was a lot longer than I needed for this style, but it didn't matter as I was going to cut it anyway. It is worth thinking about the style you wish to achieve when selecting hair, as your end result can be heavily influenced by this aspect. Some hair types do not lend themselves well to certain styles.


Cutting & Styling - I cut the hair into a pompadour style, then combed it back and ran some wax through the dry hair. I then styled it by combing the under layers back towards the crown, and then combing the front upper layers in a diagonal fashion towards one side, and using my hand to 'bump' the front to give it that pompadour look. I fixed the style with hairspray.


Overall I am pleased with how this turned out.

Saturday, 27 April 2013

Wig Cutting and Styling

As well as my passion for wig and hairpiece making, I have a more general 'all things hair' obsession too. This isn't even something that developed due to my hair loss, but is deeply rooted in my childhood. I have been pretty crazy on hair since I was a wee one, because hair was my thing, that I liked about myself and that people knew me for - rather ironic, given that it then started to leave me!

Anyway I digress, but the point of this is that to me, there is so much more to the whole wig making process than just making a wig or a hairpiece. That is just the starting point. Once the wig or hairpiece is completed, the magic needs to happen - someone has to turn that raw state into a hairdo. So there is the original styling of whatever has been made - what cut/style you wish to achieve for yourself or the wearer - and then the ongoing care & maintenance of the hair. For me, this aspect of being a wig maker has pushed me to further develop my hairdressing skills. What I have lost in being able to do with my own hair, I have gained in being able to do with other people's bio hair and with the wigs and hairpieces. I enjoy the styling and cutting aspect as much as making the wig or hairpiece itself.

One such project I recently completed:
  1. Take one virgin European human hair wig in the style of a mullet (eek!)
  2. Wash & deep condition the wig
  3. Cut the wig into a bob (as that was what was required, plus it got rid of the mullet)
  4. Blow the wig dry into desired style
So yes, I took the horrendous mullet wig style and rendered it into something more sleek and sophisticated (I think). Pictures below...

This wig needed serious styling help due to it's mullet style


The result is a far more comfortable wig, that looks rather chic. It can be worn in the classic bob style, roughed dried as shaggy layers, or even flicked out.