I wasn't anticipating taking a summer break, but such is life - things got very busy for me and I just didn't have the time to devote to updating my You Tube channel or this blog. The good news is that I am now back and raring to go. I have already made a start by uploading a You Tube video and I am in the process of uploading another. I have been having a few problems with You Tube and Windows Live Movie Maker, so we shall see if it works or not. *Fingers crossed*
Over the summer I finished off a couple of wig making projects:
- Converting a full lace wig into a regular style wig
- My first wig repair
Converting the full lace wig into a "regular-style" wig - this was a project I started back in the early summer, in a bid to make some use of a wig that I actually never wear. The wig was wrongly sized for me and just would not work when I tried to bond it. When you add to this the fact I am not crazy on bonding anymore, you end up with a wig that sits in the closet. The sad fact of the matter was that: a. I had spent a lot of money on that wig and b. the hair quality was lovely. So I thought that it was about time I tried to make it functional for me.
To cut a long story short, the way I chose to embrace this task was to edge the entire wig with monofilament galloon. This gave the wig a little more rigidity and structure. As the wig was on the large side in some areas and flapping, I decided to add a piece of elastic to the nape, along with a couple of long wig springs. This means that the nape holds down really well. I also added a zig-zag wire wig comb to the nape (but I need to remove this or alter its position as it rubs my occipital bone). I also added a few snap combs which I experimented with using by clipping them to my stocking wig cap - I am not convinced about this! It does work, but getting them and the stocking wig cap in exactly the right place is tough...
So when I went to get this baby cut, it ended up being stuck down at the front... ugh, yes I know, I know... I said no bonding! But needs must - I had an appointment! I didn't actually bond the entire front, I instead bonded the very top front from not even temple to temple, but corner to corner of my horizontal hairline (going across the top of my face) with one large piece of Supertape on the roll. Then I used some bobby pins and wedged those into the sides and a couple over my ears - instead of gripping my hair (which doesn't work) they gripped my stocking wig cap. The back needed no bonding or bobby pins - now that was a result! I basically have something that is just beyond a lace front!
If I get myself into gear, I shall show some pictures of the inside of the cap. I have pictures of the wig before and some of it after it was cut into a new style.
My first wig repair - A friend of mine, who has alopecia and has to wear wigs full time, asked me to repair a wig for her. It's a really nice wig, has a bit of wear and tear to the cap, but totally serviceable, except for the fact that it was: balding. Now I always think that a wig that is balding is a big insult! As if it's not bad enough to be bald or balding, your wig is balding too!
I should establish a couple of facts here: 1. my friend was aware of my novice wig repairing/making status and 2. I made no promises that I would do a good job.
I set about turning this balding situation around.
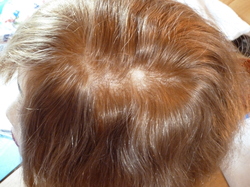


There were a few things I found out about repairing -
- The wig cap - mesh, lace, net, mono (whatever it is) should be examined prior to mending. I started mending, only to discover there were very tiny (I mean tiny) little disruptions - you can read: holes - to the lace/mononet. This meant that if one tried to ventilate there, they risked making the situation worse. I kept away from those areas and tried to ventilate so the hair would fall over them and thus, conceal them. They were literally 1 edge of a lace/net hole, but often there seemed to be several of them in the same area - as if the lace were failing slightly.
- Knots - always, always check the knots of the hair already ventilated onto the wig or hair piece before agreeing to repair it. I agreed to do it and started work before I realised that the hair on the rest of the wig was basically going to fall out pretty pronto, due to a total failure of most of the knots! I did speak to my friend about this - turns out there has been virtually no knot sealing and the use of ball-tipped pin-head brushes on the wig. I agreed to continue with the task, but in the future I would not attempt to repair anything with knots like that. It is a case of not being worthwhile for the client/friend or for the ventilator.
- It takes a long time - if you are ventilating into completely bald or almost completely bald areas, no problem, as the area is essentially clear and free of hair just like a fresh piece of lace would be. If the person whose wig you are repairing wants you to add hair throughout areas where there is already hair, but it is a bit sparse, then be prepared to spend some time doing it. This is because working in that type of area is hard. You have to continually pin the hair back so that you can see the holes and not get your needle/hook tangled up in the hair that is already there. I did use a water spray as well.
The outcome of repairing = the wig looks great, but would I do it again? Probably not! It took me far longer than expected. I was pleased with the result, but I also felt that it was one of those cases where sometimes it is perhaps better to start from scratch and make something new.
Update: my own wig making - So my own wig making has taken a back seat whilst I got on with the repair and family life. I am getting back into it this week and shall be updating again with my progress and hopefully some pictures. The second video has finally uploaded, so here's where I am at now:

